
SSL VPN Hardening
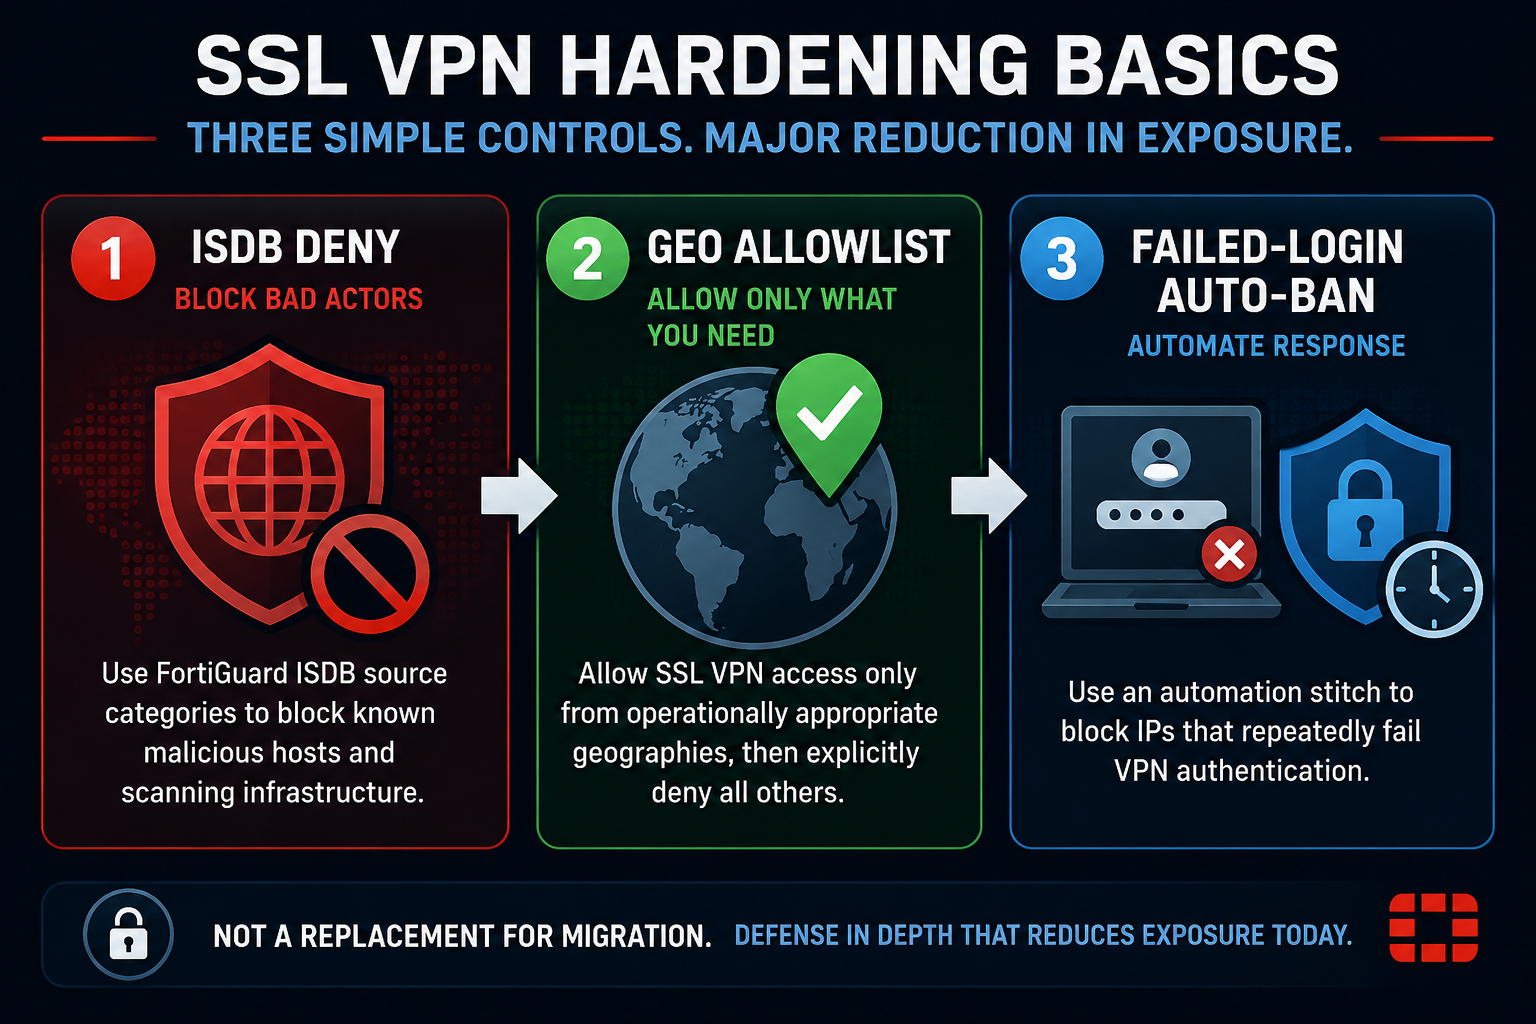
Purpose
In my previous post I had purposely left out hardening practices for SSL VPN to encourage migration to IPSEC VPN Due to Fortinet recommendations concerning the security of SSL VPN. The end goal should be to migrate off of SSL VPN in favor of ZTNA or IPSEC especially since tunnel-mode for SSL VPN is removed in FortiOS 7.6.3. However, the road to either end can be riddled with challenges that can make it so this change and subsequent upgrade to latest Fortinet recommended firmware 7.6.6 cannot be made immediately. The purpose of this blog is to provide immediate solutions that reduce the attack surface of SSL VPN for the interim. This assumes that the obvious baseline of MFA for authentication to the VPN is enabled, and if not that should be first priority.
Foundational Knowledge
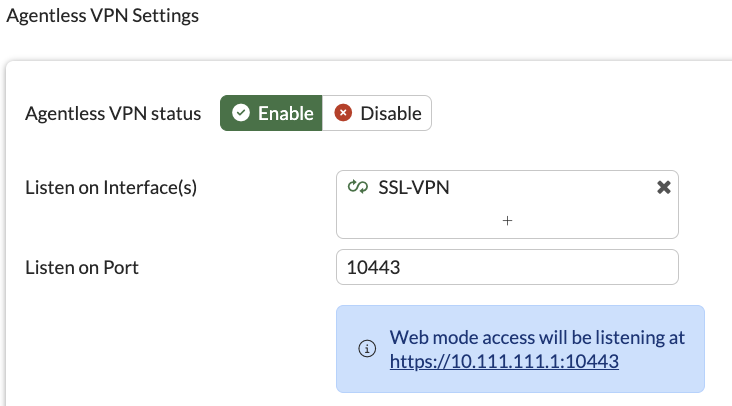
When SSL VPN is enabled on a FortiGate, the Listen on Port is opened on the interface ip of the Listen on Interface(s):
This then creates an implicit Accept Local-In policy for this interface and port that effectively makes it reachable to the world:

The goal from here is to reduce that scope from ALL to filter out hosts that should never be attempting to authenticate to the VPN.
Local-In Policies
Local-In ISDB Policy
FortiOS 7.6.0 introduced GUI configurable Local-In Policies that make securing the SSL VPN interface a bit more accessible, and 7.4.4 introduced allowing Internet Service Database (ISDB) objects to be used as the source. In fact, 7.6.0 comes factory defaulted with a policy that blocks known malicious servers. ISDB objects are lists of categorized addresses that are dynamically updated by FortiGuard as new hosts in the category are identified. While typically they are used to allow access to approved applications efficiently, they can also be used to block access to and from hosts that Fortinet has identified as malicious, or as tools that malicious actors would use to probe your device for vulnerabilities.
If you upgraded from previous versions, you can manually add the policy as follows. While the default only comes with the first three in the list, those following provide additional value and security. If you are running firmware below 7.6.0 you will be limited to CLI, otherwise you can use the GUI.
config firewall local-in-policy
edit 0
set intf "any"
set dstaddr "all"
set internet-service-src enable
set internet-service-src-name "Malicious-Malicious.Server" "Tor-Exit.Node" "Tor-Relay.Node" "Botnet-C&C.Server" "Censys-Scanner" "CriminalIP-Scanner" "Cyber.Casa-Scanner" "Hadrian-Scanner" "InterneTTL-Scanner" "Palo.Alto.Networks-Cortex.Xpanse.Scanner" "Spam-Spamming.Server" "Tor-Tor.Node" "ONYPHE-Scanner" "NetScout-Scanner" "Shodan-Scanner" "Shadowserver-Scanner" "Stretchoid-Scanner" "Tenable-Tenable.io.Cloud.Scanner" "UK.NCSC-Scanner" "Rapid7-Scanner" "Recyber-Scanner" "BinaryEdge-Scanner" "Internet.Census.Group-Scanner" "LeakIX-Scanner" "Modat-Scanner"
set service "ALL"
set schedule "always"
next
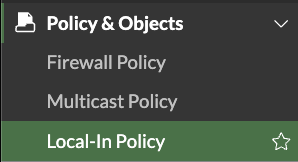
end The resulting policy is found in Policy & Objects -> Local-In Policy. You may need to enable Local-In in System → Feature Visibility if you do not see it in this list.

Local-In Geo Policy
Many organizations can reasonably assume that SSL VPN should only be accessed by IPs in the same country as them. In this case a Geo Block coupled with an implicit deny can drastically reduce the visibility of the VPN port on the internet even further.
First make a Geo Object with the country of your choice, if you want to create multiple countries then do so and bundle them into a group.
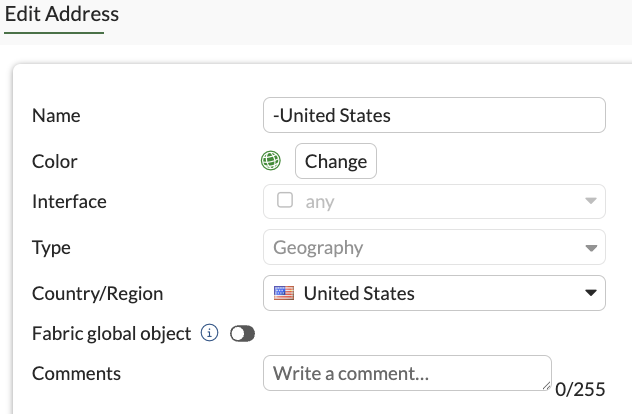
config firewall address
edit "-United States"
set type geography
set color 15
set country "US"
next
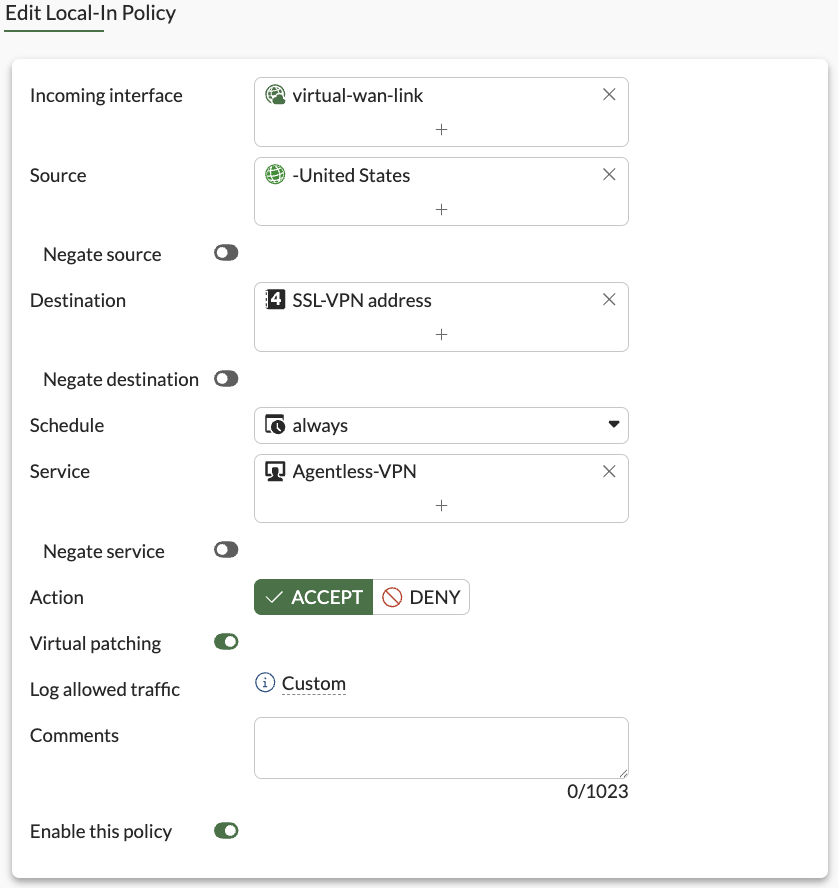
endIf you are running firmware below 7.6.0 you will be limited to CLI, otherwise you can use the GUI. Now back on Local-In Policies, create a policy below the ISDB policy for the following.
Interface: Whatever interface SSL VPN is enabled on
Source: Geo Object
Destination: Interface IP Address
Service: SSL VPN Port
Action: Accept
Virtual Patching: Enable
config firewall local-in-policy
    edit 0
        set intf <interface set on ssl vpn>
        set srcaddr "-United States"
        set dstaddr <SSL VPN interface address>
        set action accept
        set service <SSL Interface Port>
        set schedule "always"
        set virtual-patch enable
    next
end
Implicit Deny
Now create a Local-In policy that denies all so that anything not matching your Geo object is blocked. This also ensures that if someone opens up management on the public interface in the future, it will block traffic to the would be exposed port:
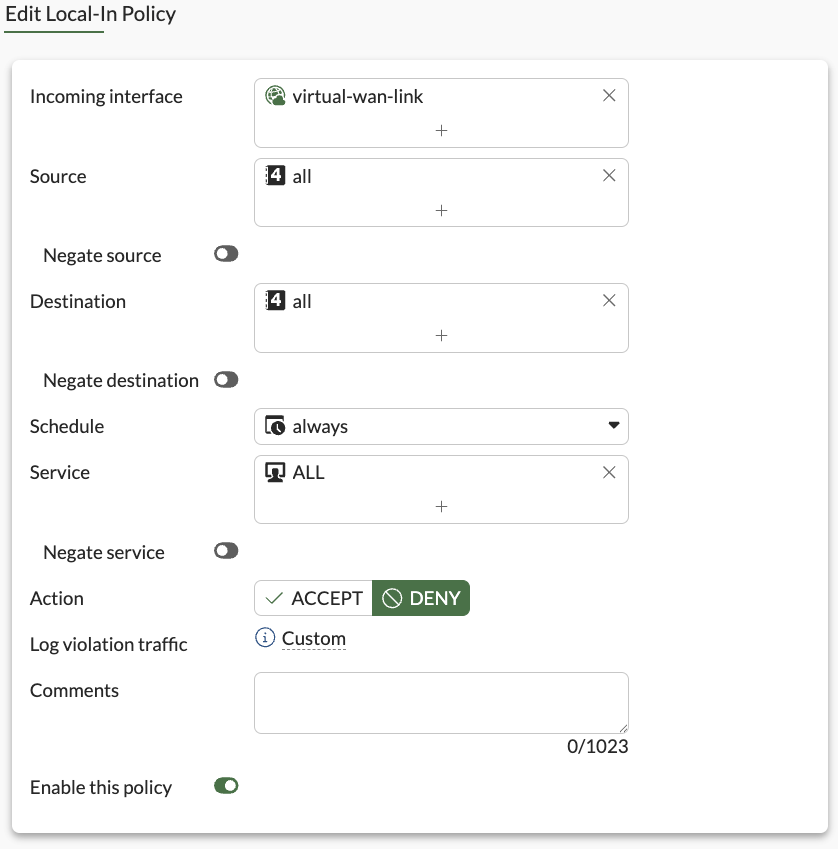
config firewall local-in-policy
    edit 0
        set intf <ssl vpn interface>
        set srcaddr "all"
        set dstaddr "all"
        set service "ALL"
        set schedule "always"
    next
end
Policy Ordering
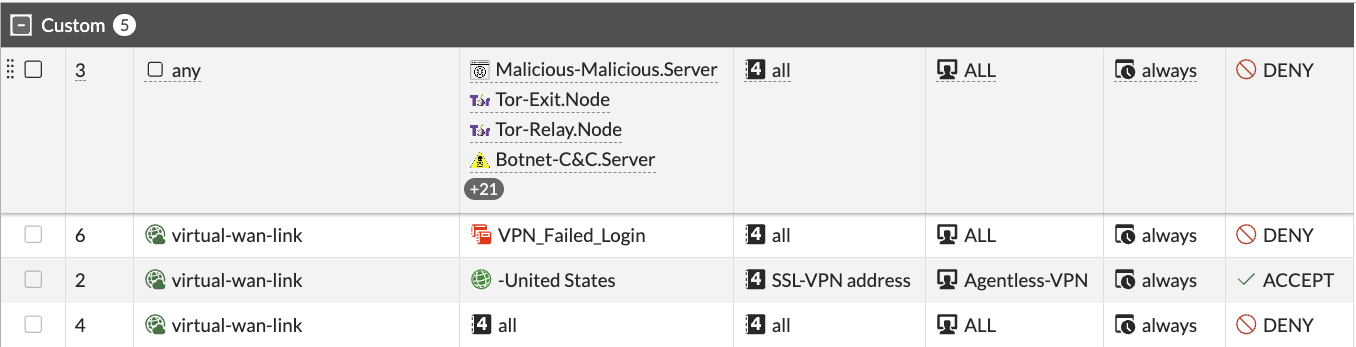
Now order your policies as follows. If you are using 7.4.x then you will need to ensure order via cli which can be done following guidance here.
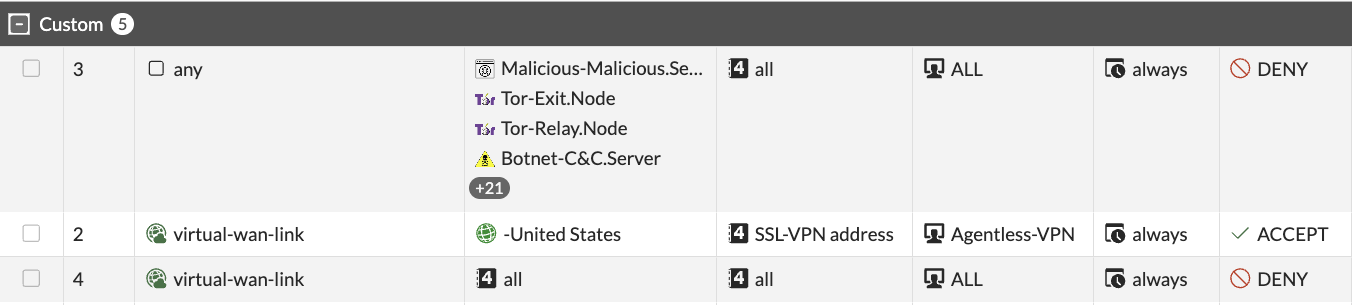
Traffic that matches malicious servers and scanners will match the top policy and block
Anything that makes it through that will first check for match on the Geo object and accept if within scope.
Anything that didn’t match the first two will drop down to the deny all policy and block the traffic.
Automation Stitch
Another way to reduce this even further is to add IPs that cross the failed VPN login threshold (default is 2 fails within 1 minute) get added to a group that is then blocked from trying to login further. This does present a possibility for false positives in which legitimate users that have forgotten their credentials may be locked, but this configuration has been validated in large production environments with minimal interruption.
Tune Failed Login Threshold
To tune the limit of failed logins before the IP is banned you can use the following. Limit range is 0-10 with 0 being no limit and not advised.
config vpn ssl settings
    set login-attempt-limit <attempt_limit>
end
Create dependent Address Group
Create an address group with no members named VPN_Failed_Login
SSL Login Failed Automation Trigger
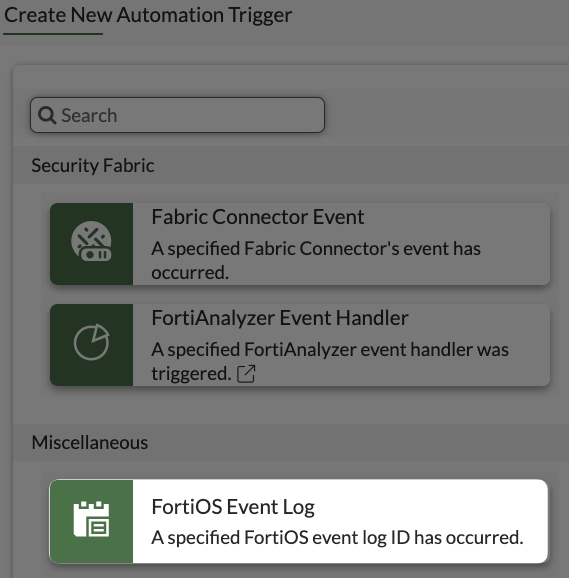
Navigate to Security Fabric -> Automation -> Trigger
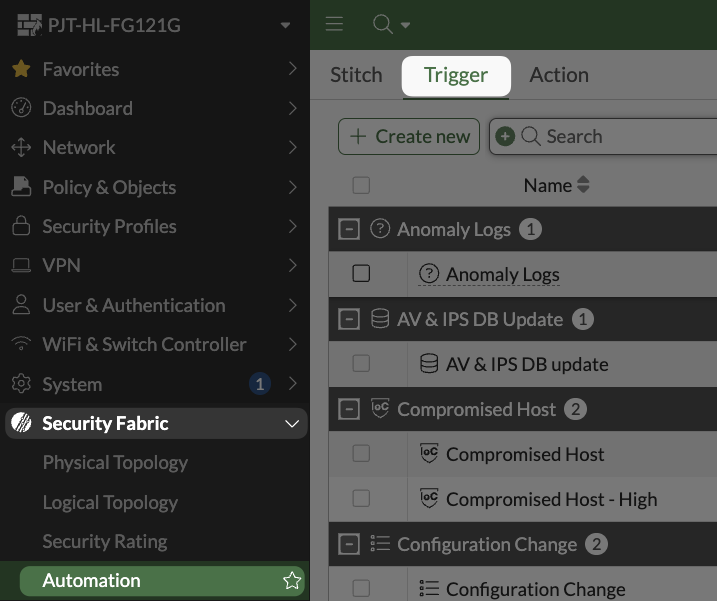
Select Create New and FortiOS Event Log as the type.
Name it SSL_Login_Fail, then under Event search and add SSL VPN login fail then select OK to save
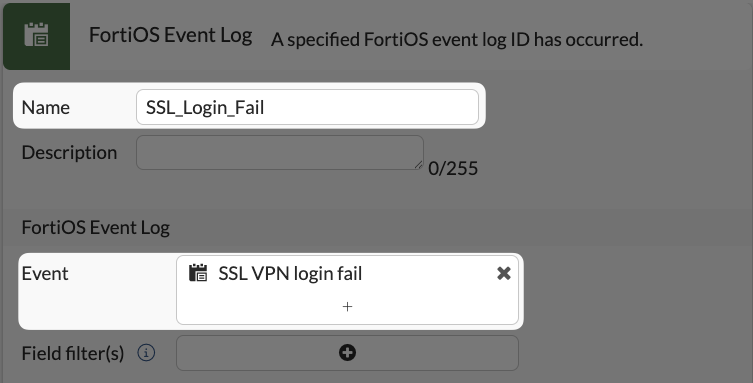
config system automation-trigger
    edit "SSL_Login_Fail"
        set event-type event-log
        set logid 39426
        next
    end
Address Object Creation Action
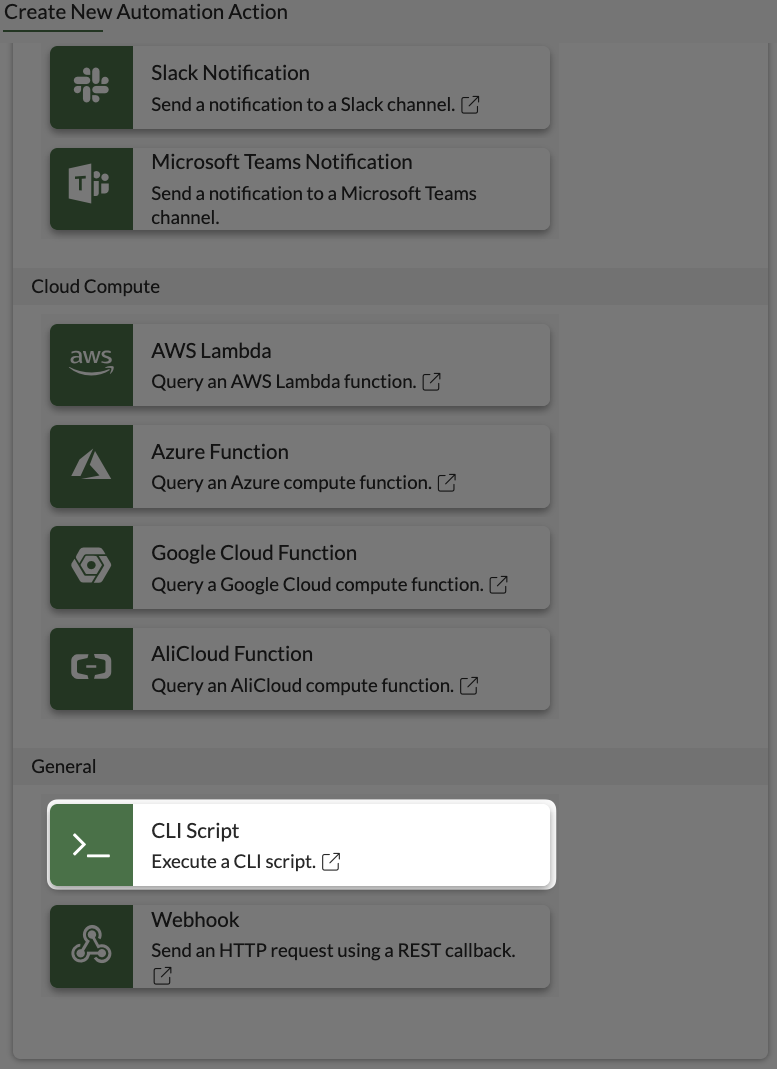
Switch to Action at the top of the Automation window
Select Create New and under General select CLI Script
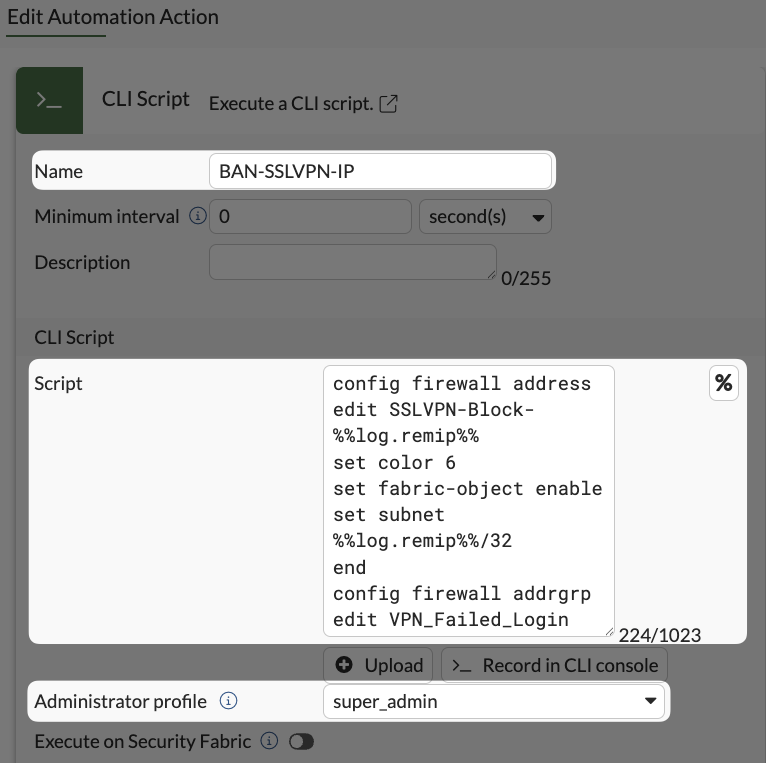
Set the Administrator profile to super_admin
Set the following block as the script:
config firewall address
    edit SSLVPN-Block-%%log.remip%%
        set color 6
        set fabric-object enable
        set subnet %%log.remip%%/32
    end
config firewall addrgrp
    edit VPN_Failed_Login
        append member SSLVPN-Block-%%log.remip%%
    end
The %% tells the script what value of the log it should be replaced with
Select OK to save.
config system automation-action
    edit "BAN-SSLVPN-IP"
        set action-type cli-script
        set script "config firewall address
edit SSLVPN-Block-%%log.remip%%
set color 6
set fabric-object enable
set subnet %%log.remip%%/32
end
config firewall addrgrp
edit VPN_Failed_Login
append member SSLVPN-Block-%%log.remip%%
end"
        set accprofile "super_admin"
    next
end
Automation Stitch
Now switch to the Stitch tab of the Automation window and select Create New
Name the stitch as you see fit, and set the Trigger as the previously created trigger, and Action as previously created action, then press OK to save. You can also add an email alert action if you want to be notified when this triggers, however this can trigger a lot of email and you will either want to tune the frequency which the email trigger can run, or create a mail flow rule to drop those alerts in a specific folder.

config system automation-stitch
    edit "SSL_VPN_Login_Block"
        set trigger "SSL_Login_Fail"
        config actions
            edit 1
                set action "BAN-SSLVPN-IP"
                set required enable
            next
        end
    next
end
Local-In Policy
Copy your Implicit Deny Local-In policy and paste it above the Geo Policy, set the source as the VPN_Failed_Login group and enable the policy:
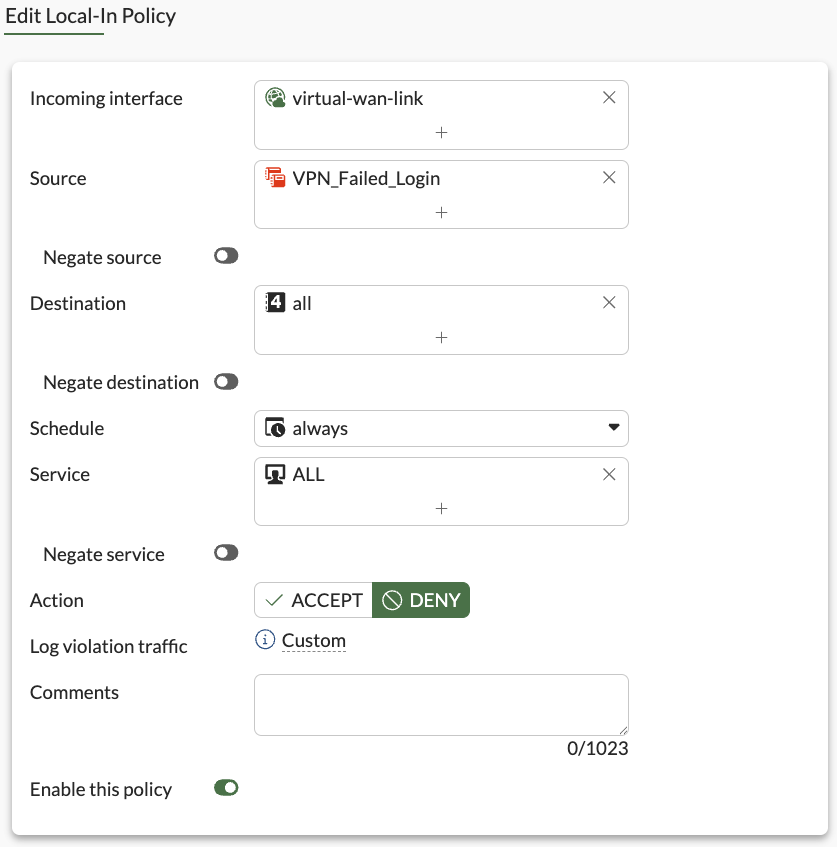
config firewall local-in-policy
    edit 0
        set intf "virtual-wan-link"
        set srcaddr "VPN_Failed_Login"
        set dstaddr "all"
        set service "ALL"
        set schedule "always"
    next
end
Your policy stack should now look like this (adjust if not), effectively blocking any IP that crosses the failed login threshold:
Conclusion
While the final goal would be to migrate to IPSEC VPN, implementing the controls recommended here will at least reasonably reduce the risk of compromise to your current SSL VPN deployment while you determine a migration path. As with any configuration, there may be additional considerations relevant to your specific environment that it is assumed you are aware of and can adequately adjust the strategies here to if necessary.