
Fortigate best practices baseline

Maybe you are a seasoned professional that has managed hundreds of networks and/or FortiGates, or maybe you are just getting started and want to make sure you set a solid foundation for your FortiGate practices. In either case, this guide will serve to guide you toward ensuring that the absolute base level of security is implemented on the FortiGates you manage so you can rest assured there are no easy wins for bad actors. Many of these checks and changes can be scripted and I may create something and link back here for that in the future, but this is something that should definitely be done to your own standards.
The Center for Internet Security (CIS) is a community-driven nonprofit, responsible for the CIS Controls® and CIS Benchmarks®, globally recognized best practices for securing IT systems and data. They have published best practices for multiple FortiOS operating systems recommending the configurations that meet their CIS Controls standard for minimal acceptable security. In this guide I wanted to make this process a bit more accessible by adding GUI screenshots and adding further thoughts to the theory. You can access the official CIS Benchmark at workbench.cisecurity.org to stay up to date with any changes. As I was writing this guide I made and proposed many updates to help get the 7.4.x version up to par to be published.
This guide was written with FortiOS 7.4.7 as a reference so at the time of writing, all references to default settings are based on this. FortiGate devices that have the Enterprise License Bundle, or another bundle plus the Attack Surface Security Rating package automatically self-audit themselves on a schedule against these controls and read back to you what the steps to remediate for your specific scenario are. The added advantage here is that even if you get everything up to compliance with these standards now, if you aren’t periodically running through this checklist and re-validating, your config may become non-compliant and you may never know. With the added package, you can receive alerts when your rating changes so you can remediate immediately.
This document assumes that you do not have this licensed and provides you with the information and steps required to audit your systems and manually configure them to comply.
**DISCLAIMER: All Guidance in this article is derived from the CIS Benchmark for FortiGate which is comingled with the author’s own thoughts and experience. The author is not responsible for and does not warrant or guarantee the outcomes of following any of the guidance provided. Any changes recommended should only be implemented by a seasoned professional that has thought and rethought about the risk and impact these changes may have to their environment. These configurations are tried and proven and this statement is not meant to deter you from aspiring to implement them all, but instead to ensure that appropriate thought and experience are put into their deployment as every environment is different from another**
DNS
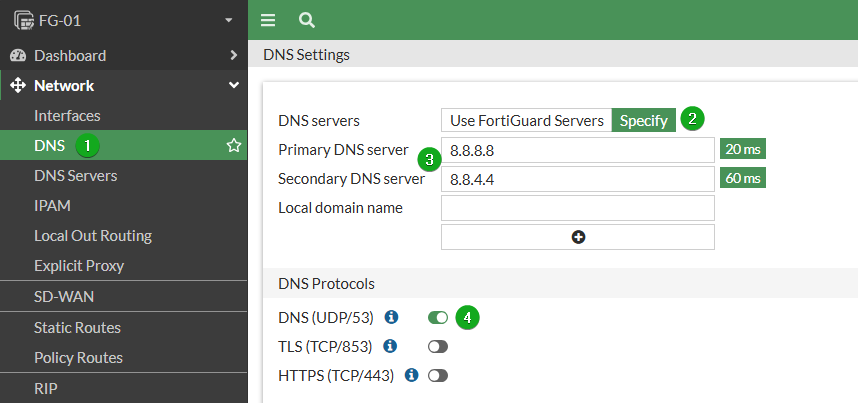
The first recommendation is to double-check your System DNS with the advisory to ensure you use DNS you trust to avoid Man-In-The-Middle attacks. FortiGates come with FortiGuard DNS 96.45.45.45 and 96.45.46.46 set as default, and since these support TLS, this is the protocol selected. For this example, we will set Google DNS.
From the GUI:
Navigate to Network -> Interfaces
Switch from Use FortiGuard Servers to Specify
Set your DNS
Switch protocol from TLS to DNS
If your DNS servers do not support TLS or HTTPS like the ones in this example, DNS will fail to resolve unless you make this change.
From the CLI:
config system dns
    set primary 8.8.8.8
    set secondary 8.8.4.4
    set protocol cleartext
end
Block Intra-Zone Traffic
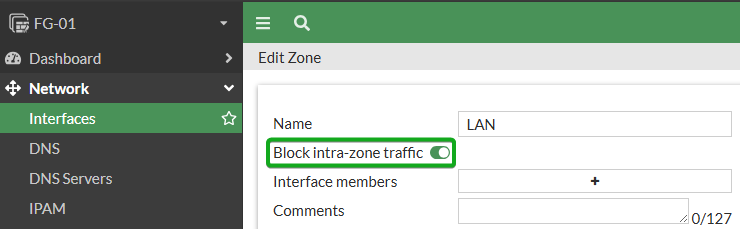
Next recommendation is to make sure that any zone configured is set to deny intra-zone traffic to ensure that only specific, authorized traffic is allowed between networks in the same zone adding an extra layer of protection between these networks. Zones are not configured at a default, but are highly recommended to make your configs more efficient, so keep note of this recommendation for any zones you create. When you create a Zone, this is selected by default, so just make sure not to uncheck. You will still be able to allow traffic between interfaces in the zone, but it will require an explicit firewall policy.
From the GUI
Navigate to Network -> Interfaces
Look for interfaces of the type Zone, highlight and select Edit or double-click one.
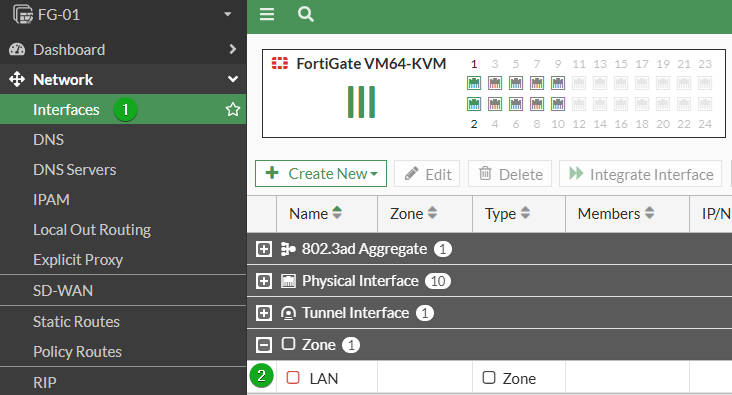
Make sure the Block intra-zone traffic slider is enabled, repeat for all zones.
From the CLI
Run config system zone then show full to show a list of all zones and whether intra-zone is set to deny. For any that are set to enable, set to deny.
config system zone
    edit LAN
        set intrazone deny
    next
end
Disable all management services on WAN ports
This should go without saying, but many people still do it either out of ignorance or apathy. Many of the high CVE score vulnerabilities with FortiGates over the past few years were only able to be exploited because someone configured management on wan ports. The only time enabling this is acceptable is when every single admin account on the FortiGate has Trusted Hosts(which is covered later) configured AND a local-in policy is configured allowing explicit access to external services that may require this. Even with these mitigating factors, the better method would be use VPN tunnels or other infrastructure designs that do not require enabling these on the WAN interface. If your concern is just remote management, FortiGate Cloud or FortiManager will likely provide what you need.
Interface roles are not always appropriately defined on a FortiGate, so it is not as easy as just checking for any interface with the Role “WAN”, I will assume that if you are auditing the system you have already established which ports are/will be WAN and which are not. And just to make sure…if you are managing the system over a WAN port currently, setup your alternate access before you make these changes otherwise you will be headed on-site with a Console Cable.
From the GUI
Navigate to System -> Interfaces and ensure there are no entries under the Administrative Access column for your WAN Interfaces.
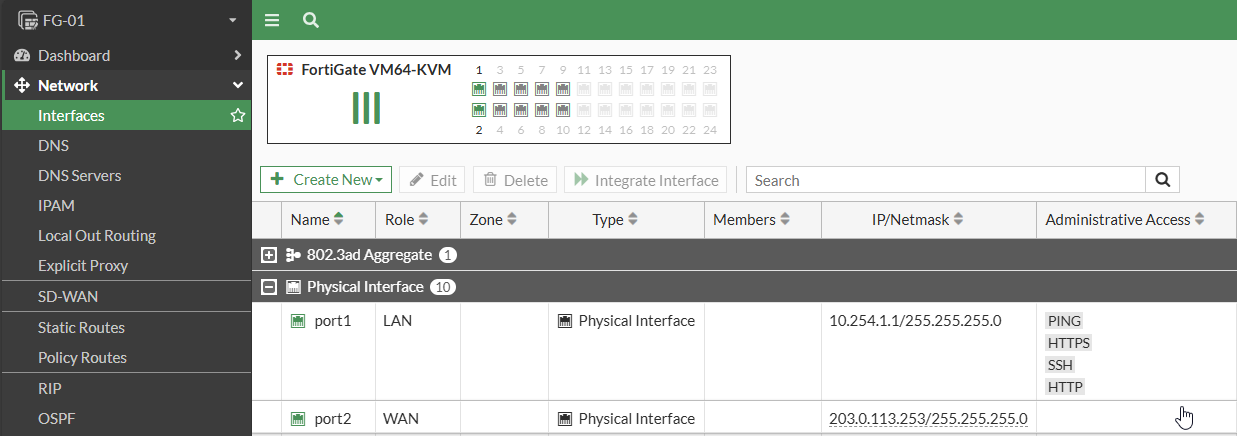
To Disable, double click the interface, and ensure that all checkboxes under Administrative Access are unchecked.
From the CLI
run config system interface then run show
config system interface
show
    edit "port1"
        set vdom "root"
        set ip 10.254.1.1 255.255.255.0
        set allowaccess ping https ssh http
        set type physical
        set device-identification enable
        set lldp-transmission enable
        set role lan
        set snmp-index 1
    next
    edit "port2"
        set vdom "root"
        set ip 203.0.113.253 255.255.255.0
        set allowaccess ping https ssh http
        set type physical
        set lldp-reception enable
        set role wan
        set snmp-index 2
    next
end
For any WAN interface with management enabled, run unset allowaccess
Pre-Login Banner
Cyber Security Teams, Company Leadership, and the Legal team should all work together to create verbiage for a pre-login banner. This reduces the risk of unintentional access by unauthorized users, and diminishes an offender’s claim of ignorance if legal action must be taken. It also gives would-be attackers that have somehow made it this far into your network a chance to think again before proceeding. By default, it is disabled.
To check if it is enabled, run the command
get system global | grep pre-login-banner
pre-login-banner    : disable
To enable run commands
config system global
    set pre-login-banner enable
end
This will set the default warning message:
PRE WARNING:
This is a private computer system. Unauthorized access or use
is prohibited and subject to prosecution and/or disciplinary
action. Any use of this system constitutes consent to
monitoring at all times and users are not entitled to any
expectation of privacy. If monitoring reveals possible evidence
of violation of criminal statutes, this evidence and any other
related information, including identification information about
the user, may be provided to law enforcement officials.
If monitoring reveals violations of security regulations or
unauthorized use, employees who violate security regulations or
make unauthorized use of this system are subject to appropriate
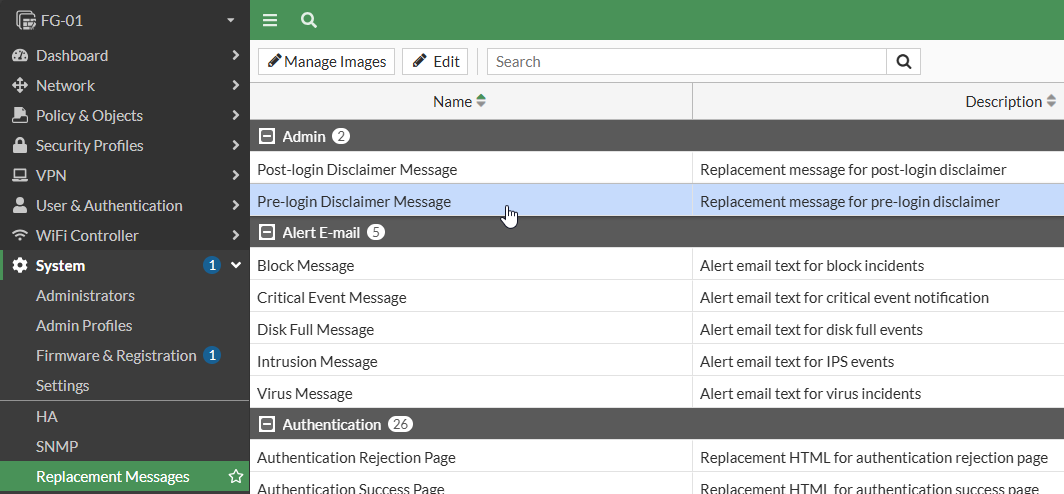
disciplinary action.If you would like to edit, navigate to System -> Replacement Messages -> Extended View -> Pre-login Disclaimer Message
Edit the message with the panel on the right, then select Save

Post-Login Banner
Very similar to pre-login banner. In some instances with SSH authentication, the admin may login without seeing the pre-login banner, so utilizing both reduces plausible deniability that they never saw the banner. It is also disabled by default.
To check if it is enabled, run the command
get system global | grep post-login-banner
post-login-banner    : disable
To enable run commands
config system global
    set post-login-banner enable
end
This will set the default warning message:
POST WARNING:
This is a private computer system. Unauthorized access or use
is prohibited and subject to prosecution and/or disciplinary
action. Any use of this system constitutes consent to
monitoring at all times and users are not entitled to any
expectation of privacy. If monitoring reveals possible evidence
of violation of criminal statutes, this evidence and any other
related information, including identification information about
the user, may be provided to law enforcement officials.
If monitoring reveals violations of security regulations or
unauthorized use, employees who violate security regulations or
make unauthorized use of this system are subject to appropriate
disciplinary action.

Last Successful Login: None
Last Failed Login: None
If you would like to edit, navigate to System -> Replacement Messages -> Extended View -> Post-login Disclaimer Message
Edit the message with the panel on the right, then select Save.
Proper Timezone Configuration
Correct time is important for SSL-dependent features to function correctly, as well as for logs to have relevant time stamps. Without logs matching timestamps, it will make investigative efforts into any sort of incident on your network extremely difficult to correlate. It is by default set to (GMT-8:00) Pacific Time (US & Canada) with Daylight Savings time enabled (DST can only be edited in CLI).
From the GUI
Navigate to System -> Settings and select your appropriate timezone from the Time zone dropdown:
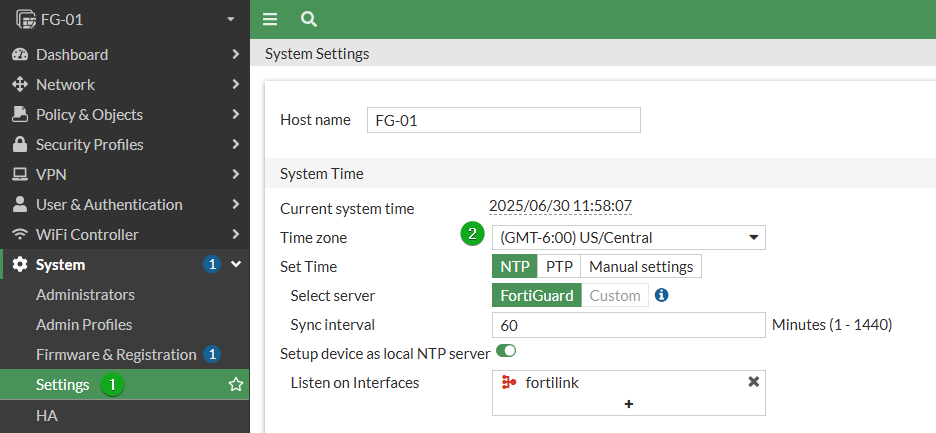
If you standardize your networks time against a central NTP server, you can edit this in the CLI.
From the CLI
To view the current timezone run
get system global | grep timezone
timezone            : US/Pacific
In this example, we will set Central Timezone (GMT-6:00). After entering the global system configuration context by running config system global type set timezone ? to list all available timezones and their IDs. The ID for Central Timezone is US/Central. To set:
config system global
    set timezone US/Central
end
Ensure Correct Time with NTP
Same rationale as previous section, while setting the timezone ensures that the device is in the appropriate timezone, the NTP server(s) ensure that they have the correct time within the timezone. This is updated via the CLI, and the default uses FortiGuard for NTP. To check the NTP status run diag sys ntp status. You will want to ensure that synchronized = yes and that all ntp hosts are reachable.
diag sys ntp status
synchronized: yes, ntpsync: enabled, server-mode: enabled

ipv4 server(ntp1.fortiguard.com) 208.91.112.63 -- reachable(0xff) S:1 T:709 selected
        server-version=4, stratum=2
        reference time is ec0d4913.f8c3052f -- UTC Mon Jun 30 17:34:11 2025
        clock offset is -0.011869 sec, root delay is 0.049957 sec
        root dispersion is 0.000458 sec, peer dispersion is 7 msec

ipv4 server(ntp2.fortiguard.com) 208.91.112.60 -- reachable(0xff) S:1 T:709
        server-version=4, stratum=3
        reference time is ec0d4935.4ce909ef -- UTC Mon Jun 30 17:34:45 2025
        clock offset is -0.011675 sec, root delay is 0.036530 sec
        root dispersion is 0.000259 sec, peer dispersion is 20 msec

ipv4 server(ntp2.fortiguard.com) 208.91.112.62 -- reachable(0xff) S:1 T:709
        server-version=4, stratum=3
        reference time is ec0d4935.4ce909ef -- UTC Mon Jun 30 17:34:45 2025
        clock offset is -0.011642 sec, root delay is 0.036530 sec
        root dispersion is 0.000259 sec, peer dispersion is 21 msec

ipv4 server(ntp1.fortiguard.com) 208.91.112.61 -- reachable(0xff) S:1 T:709
        server-version=4, stratum=2
        reference time is ec0d490b.1bce7e27 -- UTC Mon Jun 30 17:34:03 2025
        clock offset is -0.011895 sec, root delay is 0.051788 sec
        root dispersion is 0.000412 sec, peer dispersion is 11 msec
Here is an example of custom NTP servers utilizing three trusted public NTP servers that can be edited to use whatever custom servers you need.
config system ntp
    set type custom
    config ntpserver
        edit 1
            set server "time.nist.gov"
        next
        edit 2
            set server "pool.ntp.org"
        next
        edit 3
            set server "tick.usno.navy.mil"
        next
    end
end
Set a Hostname
Setting a unique hostname is important for asset inventory and identification. It also comes into play for public keys and certificates. By default, this is the serial number of the FortiGate. Your hostname should not have any spaces or special characters, use Underscore (_) or Dash (-) for segmentation of the hostname.
From the GUI
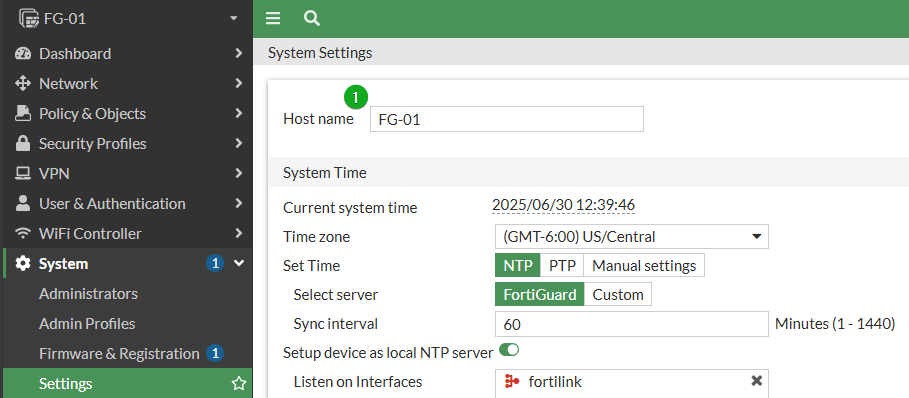
Navigate to System -> Settings and edit the name in the Host Name field
From the CLI
Run get system global | grep hostname to view the current hostname.
get system global | grep hostname
..
hostname            : FG-01
To change it
config system global
    set hostname <hostname>
end
Install Latest Recommended Firmware
This is a give-in, so we wont go too much into detail here. If an explanation of why staying up to date on firmware is important, you may be on the wrong page.
Refer to the Recommended Release for FortiOS on the Fortinet Community page to determine what the latest version the unit you are checking should be running. Staying on the latest does not mean you need to be using the newest firmware that is out, but rather that you need to be using the latest firmware in release chain. IE: If you are running 7.2.5, you should upgrade to 7.2.11, if you are running 7.4.2, you should upgrade to 7.4.8. There are also further nuances to this explained a bit more later.
To check the current version from the FortiGate, navigate to Dashboard -> Status then view the System Information widget where you will see the Firmware
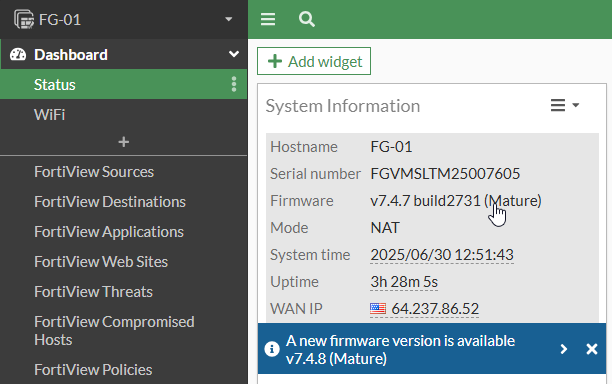
You can also view this from the Admin dropdown in the top right corner of the GUI
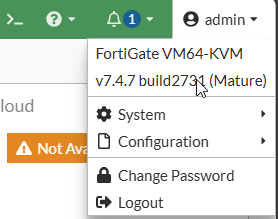
And to view from the CLI run get system status | grep Version
get system status | grep Version
Version: FortiGate-VM64-KVM v7.4.7,build2731,250120 (GA.M)
Release Version Information: GA
If the FortiGate is running any version below that in the Recommended Release article above, or is not running the latest firmware in the chain, you should research the firmware edition to ensure there are no critical vulnerabilities on it. You should also research the Bug Notes for the latest firmware edition to ensure that there are no critical bugs that will impact production. Use the culmination of your findings and proceed accordingly and also be aware of incremental upgrade paths.
Disable USB AUTO INSTALL FEATURE
Having these enabled would allow someone with physical access to manipulate the configuration or cause corruption by uploading incorrect firmware. This is enabled by default.
From the GUI
Navigate to System -> Settings and uncheck the sliders next to Detect Configuration and Detect Firmware
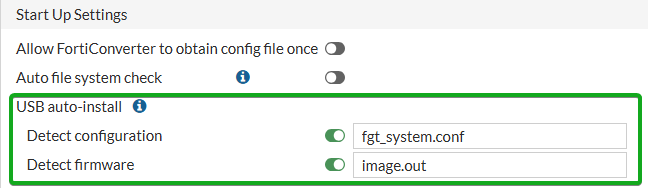
From the CLI
Run the command get system auto-install to view the current settings
get system auto-install
auto-install-config : enable
auto-install-image  : enable
default-config-file : fgt_system.conf
default-image-file  : image.out
To disable, run the following:
config system auto-install
    set auto-install-config disable
    set auto-install-image disable
end
Disable Static Keys for tls
One of two settings to prevent insecure crypto connections while maintaining broad compatibility. By default this is enabled.
From the CLI
To check the current setting, run get system global | grep ssl-static-key-ciphers
get system global | grep ssl-static-key-ciphers
ssl-static-key-ciphers: enable
To disable run:
config system global
    set ssl-static-key-ciphers disable
end
Enable global Strong Encryption
Second of two settings to prevent insecure crypto connections, this ensures that only strong ciphers are utilized for communication. By default this is enabled.
To check the current setting, run get system global | grep strong-crypto
get system global | grep strong-crypto
strong-crypto       : enable
If disabled, run the following to enable
config system global
    set strong-crypto enable
end
Set management gui to listen on tls 1.3 only
TLS 1.3 is currently the most secure supported version for administrator access and will help to prevent MiTM attacks. In FortiOS 6.x the default allows TLS 1.1, 1.2, and 1.3. In FortiOS 7.x TLS 1.2 and 1.3 are enabled. Before disabling 1.2, you should ensure that your browser is configured to use 1.3 and verify that you are establishing sessions via 1.3 to avoid interruption of management.
From the CLI
To check the current setting, run get system global | grep admin-https-ssl-version
get system global | grep admin-https-ssl-version
admin-https-ssl-versions: tlsv1-2 tlsv1-3
To set only TLS 1.3 run the following
config system global
    set admin-https-ssl-versions tlsv1-3
end
Ensure CDN is Enabled to improve GUI Performance
This has no impact on security, however it improves the performance of the GUI when accessing a FortiGate remotely. Fortinet caches GUI artifacts in CDNs which are widely available in different regions, this setting allows you to load these artifacts from a CDN that can provide them faster for you than loading them from the FortiGate will. This is enabled by default.
From the CLI
To check the current setting run get system global | grep gui-cdn-usage
get system global | grep gui-cdn-usage
gui-cdn-usage       : enable
To enable if disabled:
config system global
    set gui-cdn-usage enable
end
Enable single CPU CORE Overload Event Logging
The overall CPU usage of a FortiGate can show as low in the GUI, but a single CPU core may still be overloaded as the dashboard is reporting the overall average. To ensure this doesn’t get overlooked you can enable logging of a single CPU core overload event and be alerted on it. This is defaulted to disabled.
To check the current setting, run get system global | grep log-single-cpu-high-enable
get system global | grep log-single-cpu-high
log-single-cpu-high : disable
To enable, run
config system global
    set log-single-cpu-high enable
end
Ensure hostname is Not displayed on gui login
Displaying the hostname on the GUI login page may assist bad actors that are performing reconnaissance of your network in identifying the device they are targeting. By default this is disabled.
To check the current setting run get system global | grep gui-display-hostname
get system global | grep gui-display-hostname
gui-display-hostname: disable
To disable if you find it enabled:
config system global
    set gui-display-hostname disable
end
Ensure that Password Policy is enabled
To mitigate insecure common password usage, a password policy should be enabled on the FortiGate. While in the past, “complexity” requiring a mix of letters, numbers, type case, and symbols was recommended, focus has shifted more towards a minimum length of 15 so that the passwords are still difficult to crack and easy to remember without being predictable. Additionally, NIST no longer recommends that passwords be reset on a schedule, but rather only in the event of a credential breach. This really only mitigates if following best practices where every administrator has their own account, but if there are any shared administrator accounts these should still be set to reset on a schedule as well as be reset when any person using the shared credential is offboarded. We will assume the former for this. This setting is defaulted to Off.
From the GUI
Navigate to System -> Settings
Find the Password Policy section
Set it to Both
Set the Minimum Length to 15
Select the Apply button at the bottom of the page to save
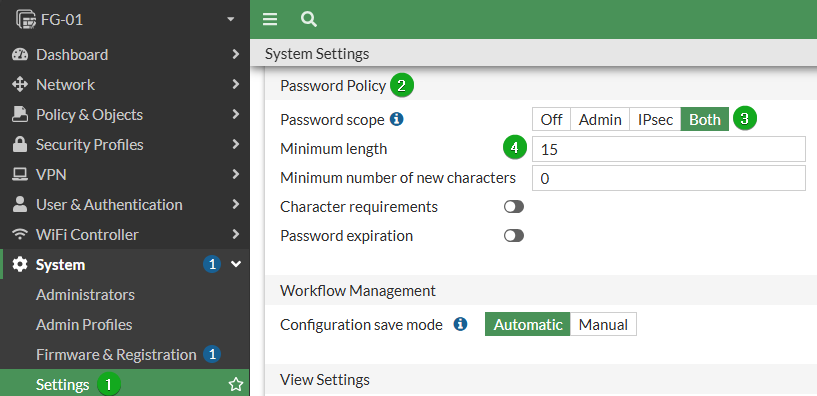
From the CLI
To check the current setting, run get system password-policy
get system password-policy
status              : disable
Run the following to enable
config system password-policy
	set status enable
	set apply-to admin-password ipsec-preshared-key
	set minimum-length 15
end
Ensure Administrator password retries and lockout are configured
Without a failed password retry limit and subsequent lockout period, the risk that a bad actor will gain access to the unit using brute force password techniques drastically increases. CIS recommends a minimum retry count of 3, and 15 minutes (900 seconds) lockout duration after those 3 failed attempts. The default on the FortiGate is 3 retries and 1 minute (60 Seconds).
To check the current setting run get system global | grep admin-lockout
get system global | grep admin-lockout
admin-lockout-duration: 60
admin-lockout-threshold: 3
To configure run
config system global
	set admin-lockout-threshold 3
	set admin-lockout-duration 900
end
SNMPv3 Best Practices
SNMP version 3 drastically improves the security over v1 and v2 as it adds authentication and can transmit data encrypted. This may not be feasible for all environments where SNMPv3 is not supported, but this is becoming rarer and rarer so a migration to SNMPv3 is in order if the only reason a migration hasn’t occurred yet is because it entails effort. SNMP is not enabled by default nor is it required in all environments, so if you find it disabled you can leave it disabled.
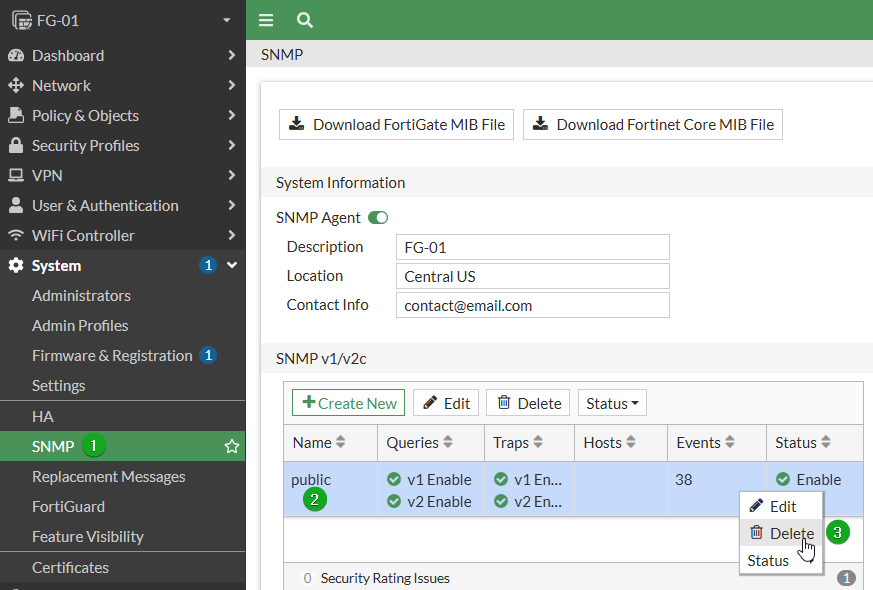
New SNMPv3 servers on the FortiGate default SNMP queries to enabled, this should be disabled if the FortiGate only needs to receive traps from other devices as SNMP Information is very useful for attackers performing reconnaissance.
From the GUI
Navigate to System -> SNMP. If there are any entries under SNMP v1/v2c you will want to first Audit what systems are polling this unit with those strings to ensure that you can setup the appropriate v3 settings on them, then you will want to delete by right-clicking and then selecting delete.
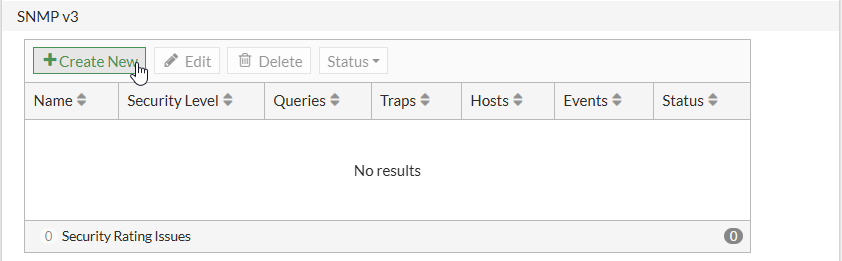
Under SNMPv3 select +Create New
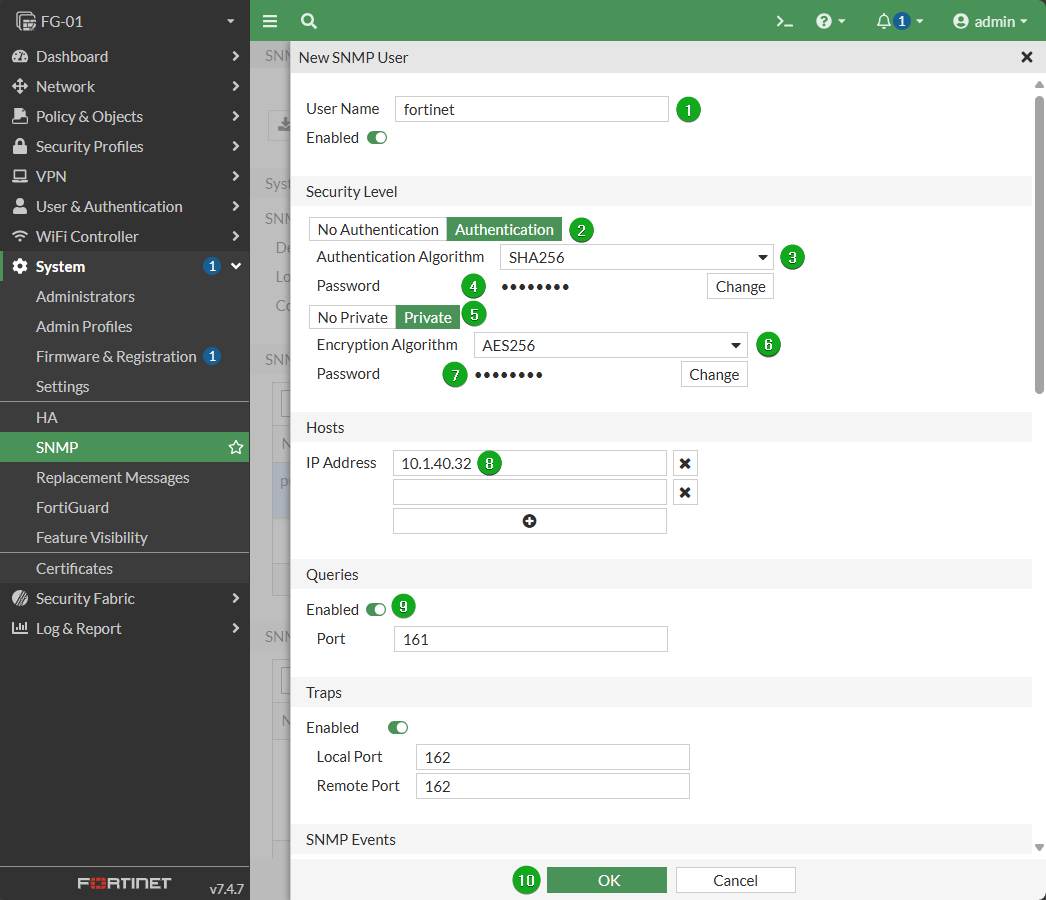
Configure the SNMP Username
Set Security Level to Authentication
Set Authentication Algorithm as SHA256
Set an appropriate Password
Set level Private
Set Encryption Algorithm as AES256
Set an appropriate password
(Optional) For IP Address(es) Set explicit hosts that are able to poll the unit for SNMPv3 events.
If the FortiGate only needs to receive traps from other hosts and does not need to respond to Queries, disable Queries
Select OK to save your settings
Make sure to hit Apply on the main SNMP page for the changes to take effect.
From the CLI
To check for the presence of any v1 or v2 communities run the commands
con system snmp community
show
config system snmp community
    edit 1
        set name "public"
        config hosts
            edit 1
            next
        end
    next
end
To delete the “public” community, run the following:
config system snmp community
    delete 1
end
To configure an SNMPv3 User, run the following
config system snmp user
    edit "fortinet"
        set notify-hosts 10.1.40.32
        set security-level auth-priv
        set auth-proto sha256
        set auth-pwd xxxx
        set priv-proto aes256
        set priv-pwd xxxx
    next
end
If queries need to be disabled, add the command:
set queries disableAdjust SNMP trap for memory usage
Monitoring the FortiGate with an SNMP server for memory usage can detect anomalies and ensure that your critical network security features remain operational and that their is no interruption to operations. This is a two-parter that would require a separate SNMP server to receive the traps from the FortiGate. This is configured at a default to alert when only 5% memory is free and the freeable memory is more than 55%. CIS recommends 20% free, and 35% freeable for earlier recognition of potential issues. In the example below, SNMP trap will trigger once memory usage is above 80% (less than 20% free memory), and the freeable memory is more than 35% (memory that can be reclaimed by the system when needed).
From the CLI
To check the current setting run get system snmp sysinfo | grep trap-free
get system snmp sysinfo | grep trap-free
trap-free-memory-threshold: 5
trap-freeable-memory-threshold: 60
To update to CIS Recommendations run:
config system snmp sysinfo
    set status enable
    set trap-free-memory-threshold 20
    set trap-freeable-memory-threshold 50
end
Admin Accounts and Profiles
CIS (and any worthwhile cybersec org or professional) recommends changing the default password, however the FortiGate requires you to do this. So we will focus this procedure on the other recommendations.
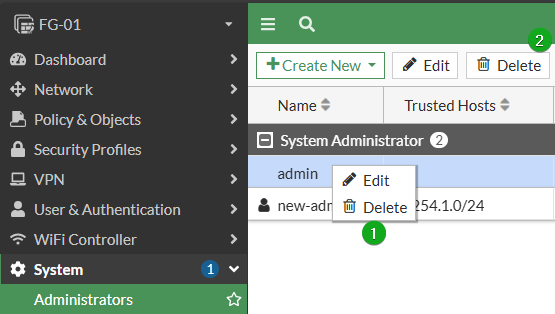
Remove Default Admin Account
With the default admin account in tact, any potential attacker already has one half of the equation (the username). First you will need to create a new administrator. This replacement of the default should be a Local account.
Configure New Admin From the GUI
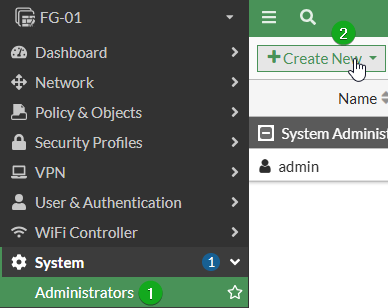
Navigate to System -> Administrators and select +Create New
Set the Username
Leave Type as Local User
Set and confirm Password
Set Administrator profile to super_admin
Personally, I leave two-factor off for this administrator, ensure I set a very secure password, and also configure the next setting so that the admin can only login from high-security networks. This is to make sure that if 2FA is malfunctioning, there is still a way to login to the firewall. All additional admins should have this enabled.
Enable Restrict login to trusted hosts and add in a LAN network you can reliable reach one of the administrative IPs from. This is another recommendation by CIS and as mentioned in an earlier sections, this should be enabled for ALL administrator accounts on a FortiGate.

Configure New Admin from the CLI
Run the following via cli replacing with your own variables
config system admin
    edit "new-admin"
        set trusthost1 10.1.50.0 255.255.255.0
        set accprofile "super_admin"
        set vdom "root"
        set password ENC SH2oYCgbDSIGMZ5Dv/RDtc2XhhdHLGek4JLw1hFf8Wy0VASk5l34sE6cwuJvJ0=
    next
end
Remove Default Admin via GUI
Login with your new admin and navigate to System -> Administrators. Right-click the default admin and select Delete, or, Highlight the admin and select the Delete button.
Remove Default Admin via CLI
Login with your new admin and run
config system admin
    delete admin
end
Configure Admin Profiles for Least Privelege
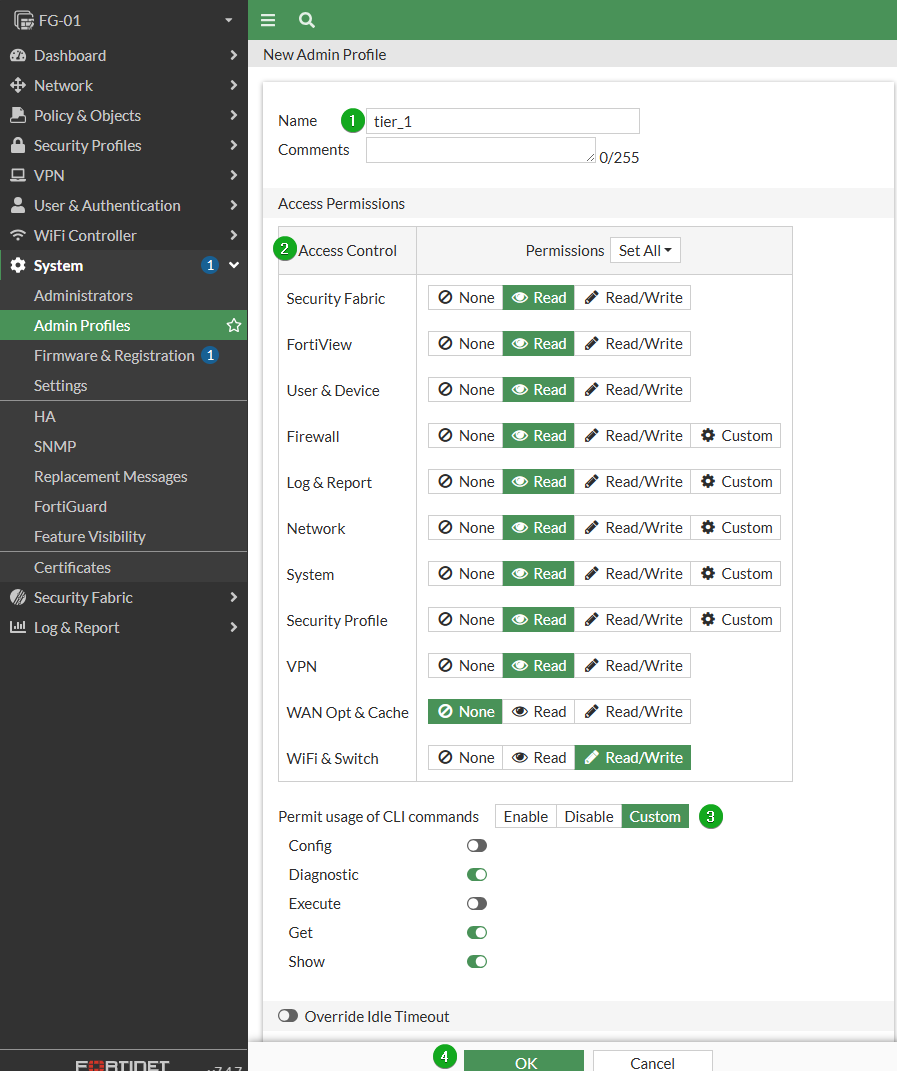
Each administrator on a FortiGate should only receive access specifically to the portion of the FortiGate they are allowed to manage. Almost every environment I have worked every admin is set to super_admin either due to ignorance or apathy. This level of access should be limited to Tier 3 Engineers. There are many instances where those users all require full access, but each time a new admin is created you should ask yourself “What exactly do they need to be able to do in here?” and then set their permissions accordingly. There are other ways to audit and alert on admin usage but those are better suited for another post altogether.
If auditing an existing system, check and verify all admin accounts and if permission profiles are applied, ensure they are appropriate and adjust if not. If all are using super_admin, then validate if this is appropriate and configure then apply new profiles accordingly.
In this example, we need the Tier 1 Helpdesk to be able to configure switch and wireless connections, and collect troubleshooting diagnostics for other issues.
From the GUI
Navigate to System -> Admin Profiles then select +Create New
Set a name for the permissions group
Configure the Access level for each module of the FortiGate. More granular settings are available for items with a Custom option.
Configure CLI permissions
Select OK to save
From the CLI
To yield the same profile above but via CLI, run the following:
config system accprofile
    edit "tier_1"
        set secfabgrp read
        set ftviewgrp read
        set authgrp read
        set sysgrp read
        set netgrp read
        set loggrp read
        set fwgrp read
        set vpngrp read
        set utmgrp read
        set wifi read-write
        set cli-diagnose enable
        set cli-get enable
        set cli-show enable
    next
end
Configure Admin Idle Timeout
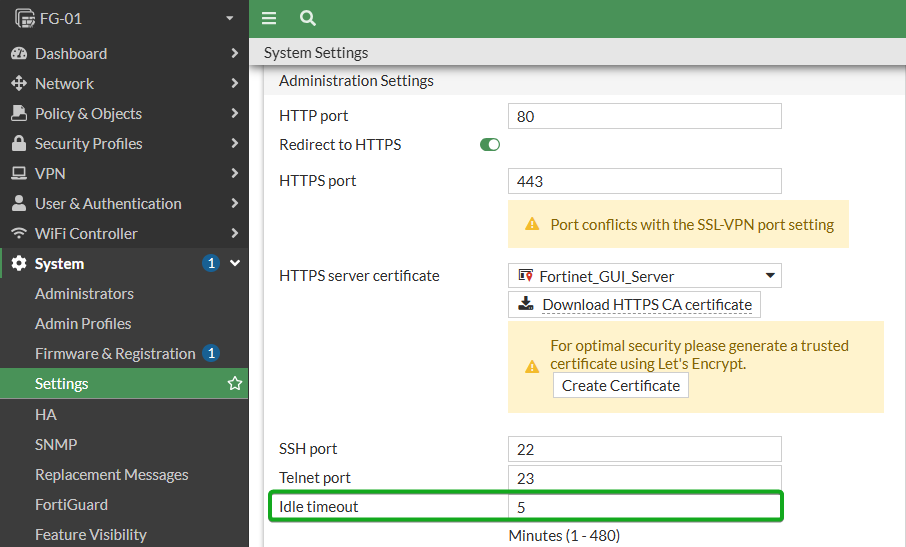
Without appropriate idle timeout set, this increases the risk of an authorized admin walking away from their desk while logged into the firewall and an unauthorized user assuming their session. This is especially critical now that many IT Admins work remote and there is no control over the physical security of the environment they are accessing the firewall from.
By default, this is set to the CIS recommended 5 minute timeout.
From the GUI
Navigate to System -> Settings then scroll down to the Administration Settings section. Here you will find Idle timeout. If set to anything longer than 5 minutes, change is strongly recommended. Update as needed, then click Apply at the bottom of the page.
From the CLI
To check the current setting run get system global | grep admintimeout
get system global | grep admintimeout
admintimeout        : 5
To change it via cli run
config system global
    set admintimeout 5
end
Ensure only encrypted Admin protocols are enabled
Unencrypted access over http or telnet would allow a MiTM attack to sniff out login credentials. At a default, http redirects to https on a FortiGate, and telnet is only able to be turned on via cli. It is still good practice to disable http altogether as risk assessments and auditors will still count it against you.
From the GUI
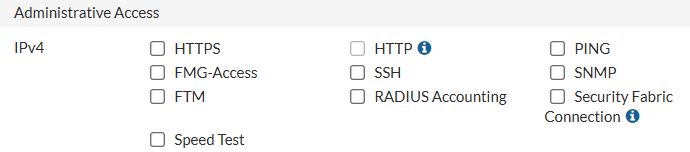
Navigate to Network -> Interfaces and ensure that HTTP and Telnet are not present in the Administrative Access column for any interface.

If you do find either present, edit the interface and uncheck the boxes in the Administrative Access section, then click Apply to save.
From the CLI
run the following:
config system interface
show
config system interface
..
    edit "port3"
        set vdom "root"
        set allowaccess https http telnet
        set type physical
        set snmp-index 3
    next
..
end
And check the set allowaccess line for all interfaces and ensure that http or telnet are not enabled. On devices with many interfaces, you can save the output of the cli, open in a text editor and run a ctrl+F for the words http and telnet to get a full picture. To unset these protocols while leaving encrypted protocols in tact, run the set command again but omit telnet and/or http:
config system interface
    edit "port3"
        set vdom "root"
        set allowaccess https
        set type physical
        set snmp-index 3
    next
end
Change Default Admin ports
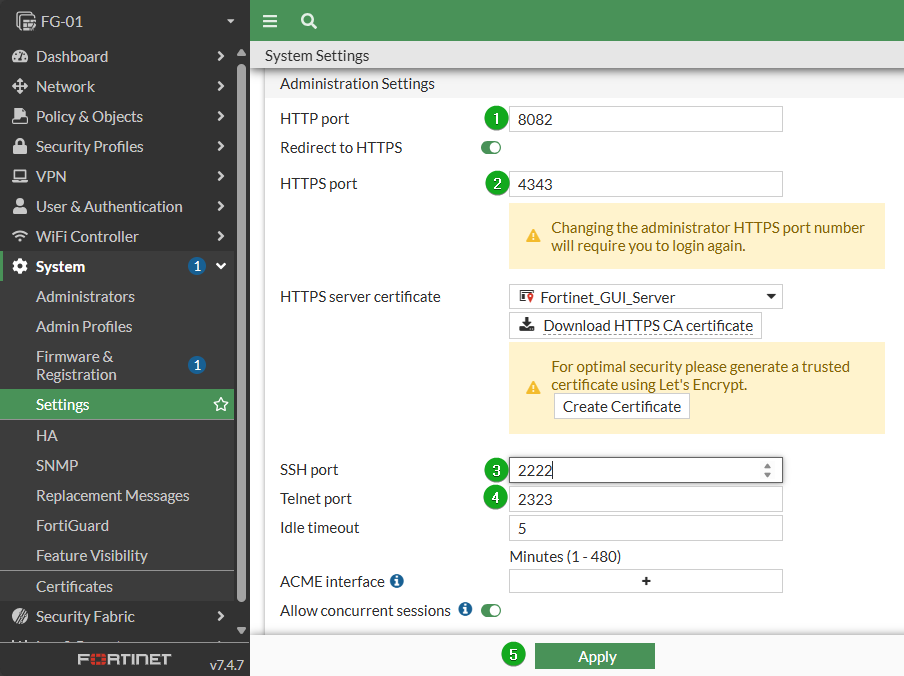
When an attacker starts performing reconnaissance on a network, they will typical reduce their scanning efforts to common ports like 22, 80, 443, 3389, etc. This is to reduce time and resource overhead, as well as to avoid triggering alarms when full port scans are performed. A simple way to slip past these initial scans is to edit the default ports. For this example we will change http to 8082, https to 4343, Telnet to 2323 and SSH to 2222, but you can use an uncommon port you would like. Please note that if doing this via GUI or SSH, you will need to re-establish your admin connection after committing the change.
From the GUI
Navigate to System -> Settings then scroll down to Administration Settings.
Edit the HTTP port
Edit the HTTPS port
Edit the SSH port
Edit the Telnet port
Click Apply to save changes
From the CLI
To check which ports are currently set run get system global | grep port
get sys glob | grep port
admin-port          : 80
admin-sport         : 443
admin-ssh-port      : 22
admin-telnet-port   : 23
..
To implement the change run:
config system global
    set admin-port 8082
    set admin-sport 4343
    set admin-ssh-port 2222
    set admin-telnet-port 2323
end
Local-In Policies
This is a very important configuration, and one that you want to do your best to have physical access to the device before implementing unless you have full confidence you can implement without locking yourself out. Alternatively, if you have a jumpbox that is console connected to the unit, or if you have a FortiExtender unit managed by FortiEdge cloud you can connect a console cable from it to the FortiGate for Out of Band Management (Will cover in a future post).
If you aren’t familiar with what Local-In means, “Local” refers to traffic that is “Local” to the interface IPs of the actual FortiGate, and “In” would be inbound traffic to those interfaces. To get a good understanding, review Forward Traffic logs vs. Local Traffic logs on the FortiGate. You will see that your administrative sessions are logged in Local instead of Forward, because the traffic is to a local interface on the FortiGate.
As discussed earlier, you NEVER want to open administration on a WAN port without an explicit Local-In policy even when using Trusted Hosts. The reason being that if a new admin is created and trusted hosts is not set, the firewall management will now effectively be open to the world. The Local-In policy would be the mitigating factor as it supersedes the trusted hosts setting. For the same reason, it is also good to utilize this for any lan admin access to ensure that your boundaries aren’t subverted by a simple mistake that is easy to make.
Currently Local-In policies are only configurable in the CLI with firmware 7.4.x, however they are configurable in the GUI starting on 7.6.0 (which has been released but at the time of writing is not yet recommended for production).
Whenever administration is enabled on an interface in a FortiGate, a Local-In policy is created allowing ANY -> <Interface>, when a custom Local-In policy is created, it is placed above all auto policies and takes affect before them. The goal is to have Local-In policies for all interfaces that have administration ports open on them and for those policies to limit access to the network(s) that are set on trusted hosts.
To see which custom Local-In policies currently exist (if any) run the following
config firewall local-in-policy
show
If empty, there are none. Otherwise, review the policies against your management interfaces and Trusted Hosts.
Ahead of configuring a policy, I have created a policy group named FW_MGMT with all the ports we are concerned with locking down for management:
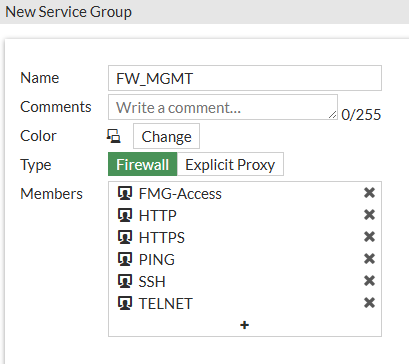
The only service that didn’t exist at a default was the FMG-Access which is TCP-541 for FortiManager. Here is a script to create this service and the group:
config firewall service custom
    edit "FMG-Access"
        set category "Network Services"
        set tcp-portrange 541
    next
end
config firewall service group
    edit "FW_MGMT"
        set member "FMG-Access" "HTTP" "HTTPS" "PING" "SSH" "TELNET"
    next
end
Now we will create a policy which will only allow subnets in the Address Group FW_MGMT_TRUSTED to access management ports on interface port5.
config firewall local-in-policy
    edit 10
        set intf "port5"
        set srcaddr "FW_MGMT_TRUSTED"
        set srcaddr-negate enable
        set dstaddr "all"
        set action deny
        set service "FW_MGMT"
        set schedule "always"
        set status enable
    next
end
The key line to make this one policy instead of two is the set srcaddr-negate enable , this makes it so that the policy is only only effective for subnets that ARE NOT contained within the FW_MGMT_TRUSTED group. Since the policy action is set to Deny this means that all submits not in the group will be denied access to these ports, whereas those defined within the group are allowed. See the community article linked here for a further explanation.
Virtual Patching on Local-In
While the policy above alone is enough to protect access to the admin ports, policies with action deny are not eligible for Virtual Patching. Virtual Patching is built on Fortinet’s IPS engine so that if a vulnerability with the administrative or other ports on a FortiGate is found, Fortinet can centrally distribute an update to the FortiGate’s IPS Signature database to protect it against this attack without having to schedule downtime to install a patch. This closes the window in which a device is vulnerable from the time that the vulnerability is announced to when the patch can be applied. This same security can be implemented between all devices on networks that are routed on the FortiGate.
To implement this, we create a policy just like the above, except we don’t enable srcaddr-negate, and we enable virtual-patching
config firewall local-in-policy
    edit 5
        set intf "port5"
        set srcaddr "FW_MGMT_TRUSTED"
        set dstaddr "all"
        set action accept
        set service "FW_MGMT"
        set schedule "always"
        set virtual-patch enable
    next
end
High Availability
I will add these in at a later time or link to a separate post specifically regarding HA. For now, here are the bullet points:
Configure High Availability
Ensure Monitor Interfaces are enabled
Ensure HA Reserved Management Interface is configured
Ensure that a non-default HA Group-ID is configured
Policy and Objects
Ensure that Unused policies are reviewed and disabled regularly
Keeping around unused firewall policies creates a messy config that reduces efficiency, and they can also accidentally allow or block traffic. There is no easy way to audit this via CLI, so we will look at how to do so with the GUI. If your FortiGate is licensed for the Attack Surface Security it will list out all of the offending policies for you, but we will proceed as if it doesn’t.
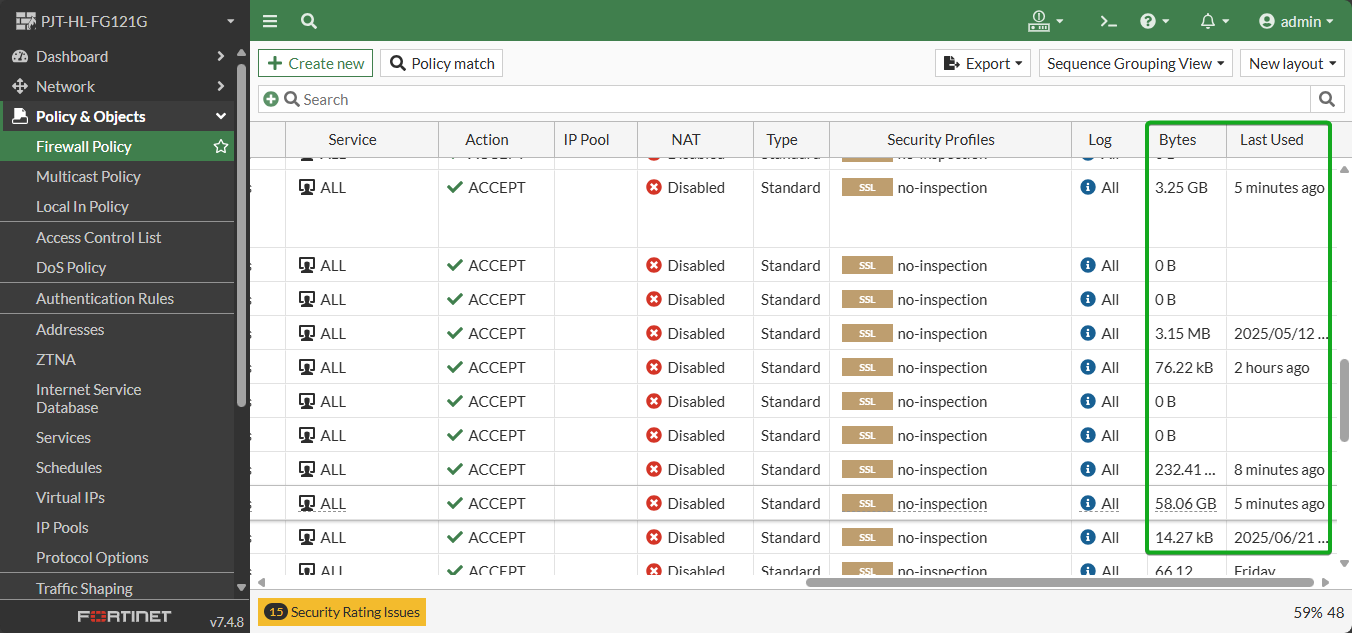
To find policies that haven’t been used ever, or within a given period of time:
Navigate to Policy & Objects -> Firewall Policy
Click the gear icon in the header
Select the Last Used column
Select Apply to save the view

Scroll all the way to the right and view the Bytes and Last Used columns. Identify any policies that have 0 B in the Bytes column, or if their Last Used Date is beyond your acceptable threshold. CIS recommends that this be either every 6 months or during your Business Continuity Plan Practice. Any offending policies should be deleted.
Ensure Policies do not use all as a service
All Firewall policies should be limited explicitly to the services that are required. This ensures that traffic to unauthorized services is not allowed by mistake. This is one that can have a huge impact if not planned properly as you can end up blocking things you hadn’t identified as necessary.
First, identify the policies that have Service set to all by
Navigate to Policy & Objects -> Firewall Policy
Select the funnel icon on the Service column
Select All from suggestions
Select Apply to run the filter
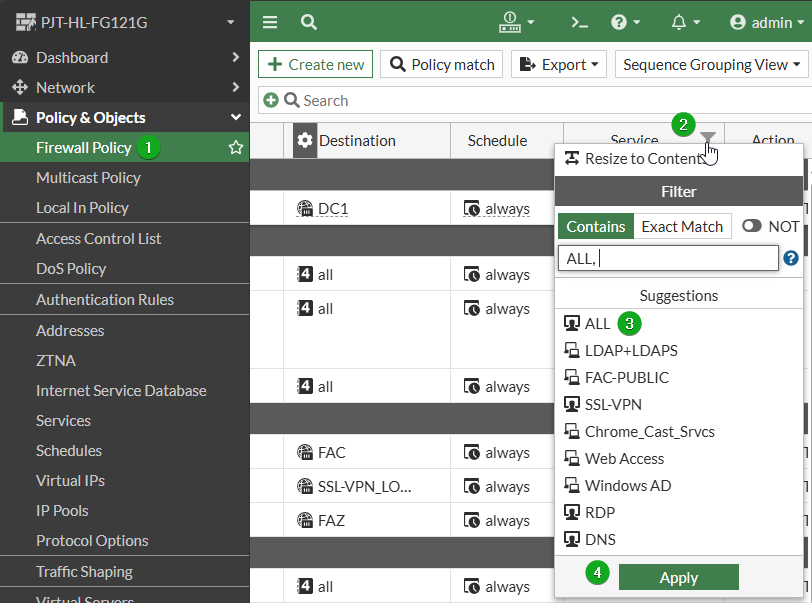
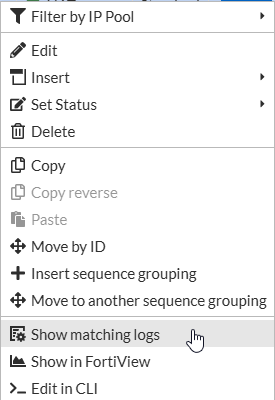
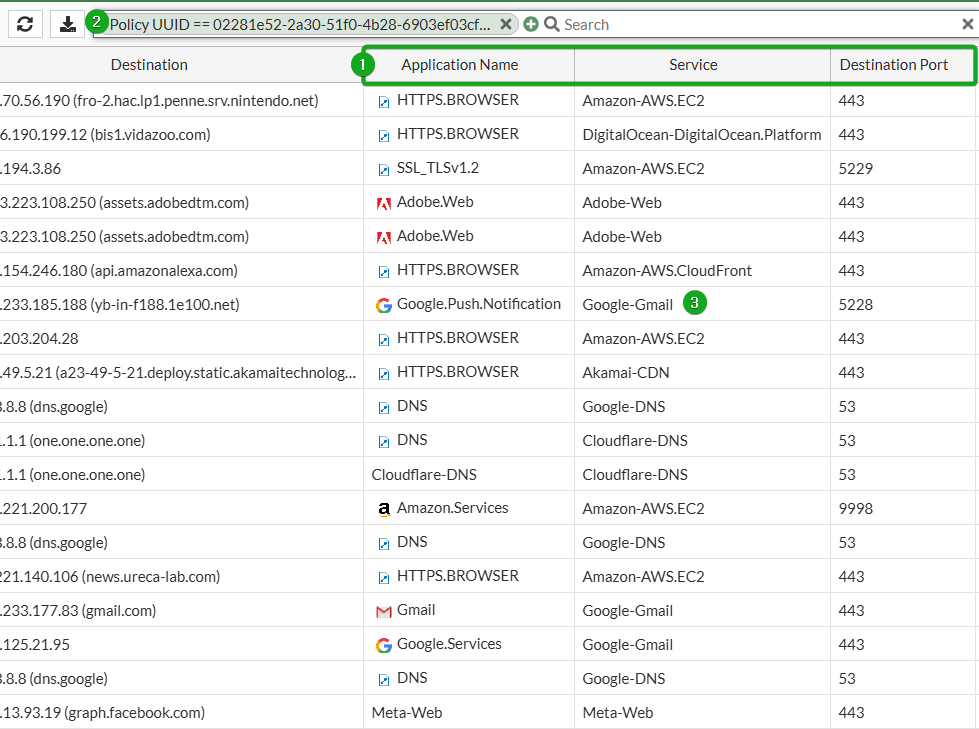
You will now have a list of all policies with “All” as a service. Right-click one of the policies and select Show Matching Logs to review what services are running on the policy.
Click the gear icon on the top left of the log table, and add the Service and Destination Port columns.
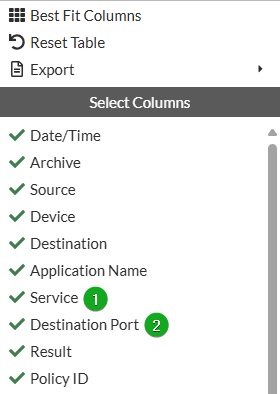
From here, I like to group (1) Application Name, Service, and Destination Port together, then you can review in the GUI, (2) make note of the Service column as you will want to use Internet Service Database (ISDB) objects in a separate policy for these since they can be random and/or dynamic. Follow instructions here to export to CSV for deeper analysis and filtering
Beyond the services in the default Web Access and Email Access groups, I found NTP (Port 123), IKE (Port 500 and 4500) which I use for work, and I want to allow PING as well. I found some other ports that I will use ISDBs for following this. These services are all built-in objects on the FortiGate, so I created an object group encompassing them all with this script:
config firewall service group
    edit "Internet_Allowed_SVC"
        set member "IKE" "NTP" "PING" "Email Access" "Web Access"
        set color 3
    next
end
Next, I took the ISDB objects I found on non-standard ports and created an ISDB Group from them as follows:
config firewall internet-service-group
    edit "Approved_ISDB"
        set direction destination
        set member "Google-Web" "Google-ICMP" "Google-DNS" "Google-Outbound_Email" "Google-SSH" "Google-FTP" "Google-NTP" "Google-Inbound_Email" "Google-LDAP" "Google-NetBIOS.Session.Service" "Google-RTMP" "Google-NetBIOS.Name.Service" "Google-Other" "Google-Google.Cloud" "Google-Gmail" "Microsoft-Skype_Teams" "Meta-Whatsapp" "Apple-APNs" "Amazon-AWS.EC2" "Cloudflare-Other"
    next
end
Now, a policy may only include either Destination Address Object + Service Object OR Destination ISDB Objects, but not both. So two policies are required. After updating the original policy with the new service group, create a new policy below it with your ISDB object group. This is highly dependent on the environment, so instead of walking through, I will just show a visual of how they should look in the end. Rinse and repeat until none of your policies have ALL as a service.

DENY ALL Traffic to and from known malicious hosts
This is where the beauty of FortiGuard really shines. Rather than have to maintain a list of offending hosts and continuously update an address object through various means manual or automated, there are built in ISDB objects for malicious hosts built into the FortiGate. These objects are dynamic and seeded with host information from all of the billions of threat intelligence logs being gathered by FortiGuard every day, this means that whenever a new malicious service within the category of these objects is identified by FortiGuard, it is automatically distributed to the object in your FortiGate. Because you can safely know that you would never want traffic coming from or going to any of these hosts, the recommendation is to create the only acceptable use of “any/any” policies known to the greater good. First we will gather these objects into a group, which is currently only available in CLI. Some objects are relevant only as a source, and some as a destination, so two groups are needed:
config firewall internet-service-group
edit "Malicious_ISDB_DST"
set direction destination
set member "Botnet-C&C.Server" "Phishing-Phishing.Server" "Spam-Spamming.Server" "Proxy-Proxy.Server" "Malicious-Malicious.Server" "Hosting-Bulletproof.Hosting"
next
edit "Malicious_ISDB_SRC"
set direction source
set member "Botnet-C&C.Server" "Phishing-Phishing.Server" "Spam-Spamming.Server" "Tor-Exit.Node" "Proxy-Proxy.Server" "Malicious-Malicious.Server" "Hosting-Bulletproof.Hosting" "Censys-Scanner" "Shodan-Scanner"
next
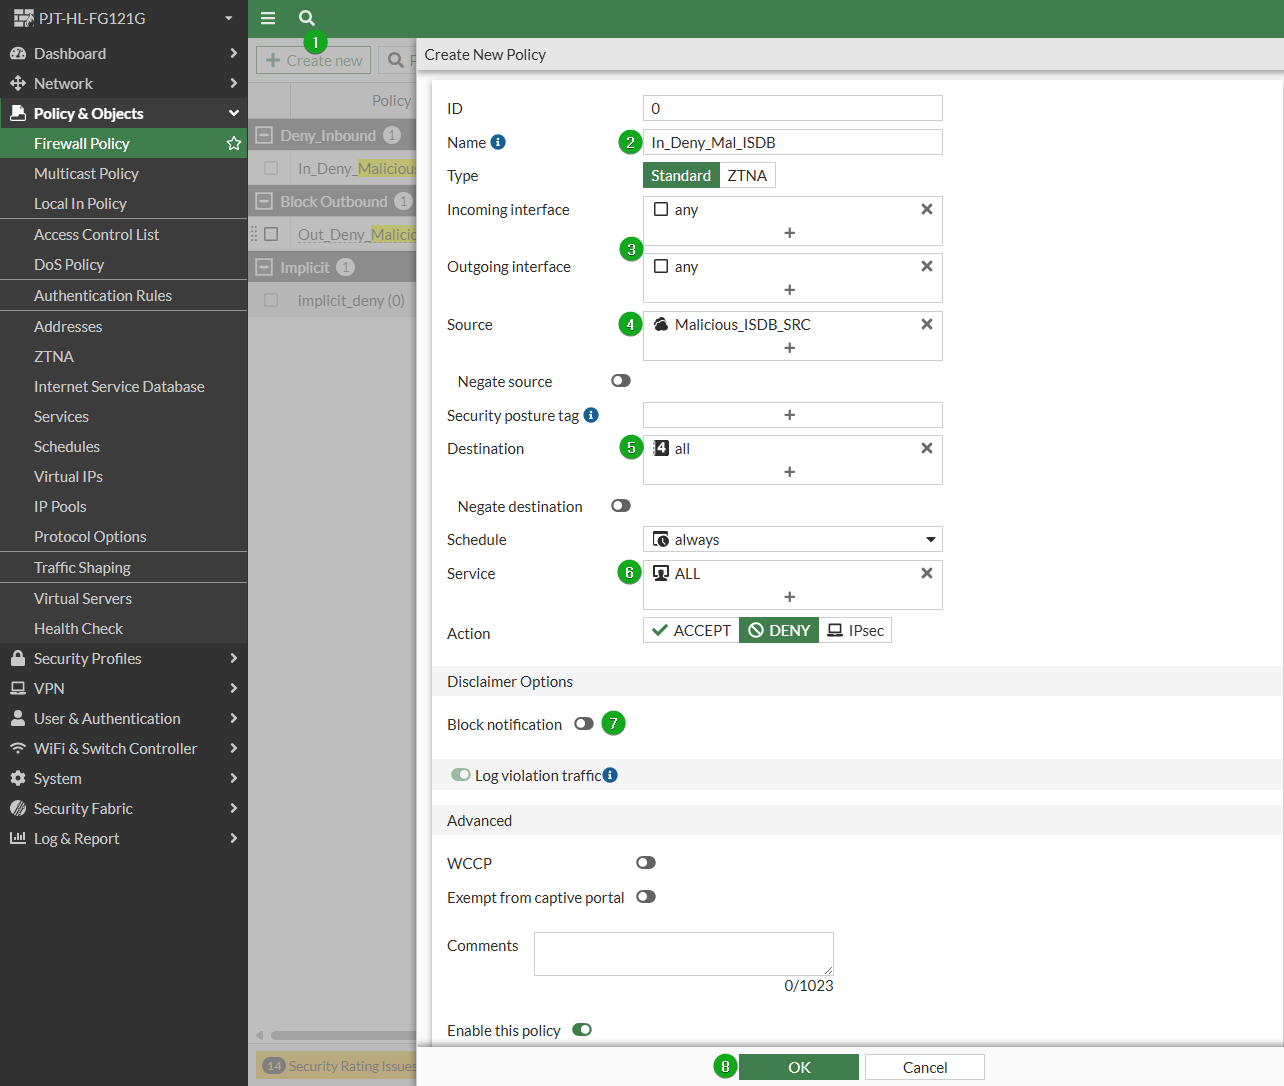
endFrom here, you should create an inbound policy and an outbound policy. The Inbound policy should be placed above all other inbound policies, the Outbound policy should similarly be placed above all Outbound policies. The safest bet is just to make these two policies the top policies of your FortiGate.
config firewall policy
    edit 0
        set name "In_Deny_Malicious_ISDB"
        set srcintf "any"
        set dstintf "any"
        set dstaddr "all"
        set internet-service-src enable
        set internet-service-src-group "Malicious_ISDB_SRC"
        set schedule "always"
        set service "ALL"
        set logtraffic all
    next
    edit 0
        set name "Out_Deny_Malicious_ISDB"
        set srcintf "any"
        set dstintf "any"
        set srcaddr "all"
        set internet-service enable
        set internet-service-group "Malicious_ISDB_DST"
        set schedule "always"
        set logtraffic all
        set block-notification enable
    next
end
To do this in the GUI
On the Policy & Objects -> Firewall Policy page, select +Create New
Name your Policy
Set both Incoming and Outgoing interfaces as Any
On the Inbound policy, set the Source as your Inbound ISDB object by using the Internet Service filter in the object selection.(For your outbound policy, set this to all).
On your Destination, use the object all. (For your outbound policy, set this to the ISDB group)
On your Service use the object ALL, and set the Action to Deny
On inbound policy, Block Notification should be disabled, but on outbound it should be enabled.
Select OK to save the policy
To Create the reciprocal policy, right-click it, select clone, then edit and switch the source and destination.
Ensure Logging is enabled on all Firewall Policies
Without logging enabled on all policies, SOC and NOC analysts cannot perform complete investigations into security or network incidents. This is easy to check and change. Navigate to Policy & Objects -> Firewall Policy then scroll over to the Log column and make sure all policies are set to log. You can easily enforce this by selecting the first policy, holding the shift button, then selecting the last policy. From there you would click the pencil to edit all policies
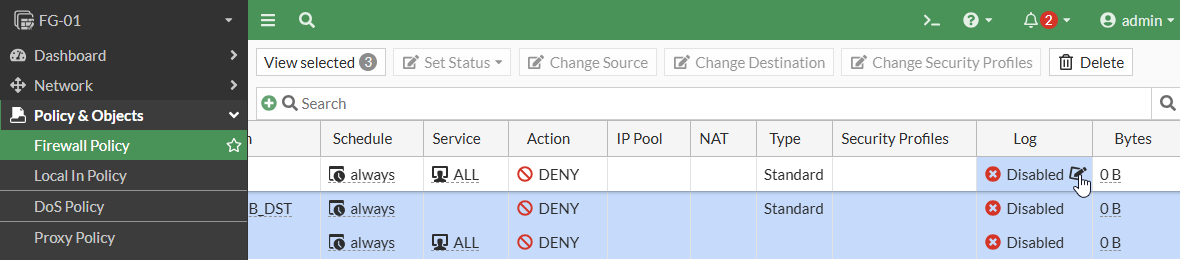
Now select All and all policies will now log
Security Profiles
IPS: Detect Botnet Connections
This is relevant to traffic coming to or from the internet. If you are not already using IPS profiles for all traffic, you should first test, validate, and apply it in your environment. This is a task best suited for another post. But assuming you already use IPS on internet traffic, all you need to do to block Botnets is to open each IPS profile in use and set the option.
Navigate to Security Profiles -> Intrusion Prevention and open one of the profiles you have in use
Set Scan Outgoing Connections to Botnet Sites to Block
Select Ok to save your changes.

Repeat for all IPS profiles in use involving internet traffic.
IPS: Inter-Network Inspection
Are you routing all of your networks with a FortiGate licensed for IPS? No? Be a lot cooler if you did…
Main reason being is that you can enable IPS inspection between any network routed on a FortiGate, even for intra-subnet traffic via arp proxy.
If you are fortunate enough to be in this situation, you should absolutely use IPS between networks. To reduce the load on the firewall and reduce the chances of false positives, custom IPS profiles should be made for these purposes in which the Operating systems on each network are evaluated, and signatures relevant specifically to them are applied to the profile. This is also a process for another post, but you are definitely not getting the full value from your investment without utilizing this.
Implementation is easy but should follow appropriate testing and validation beforehand. To implement, apply certificate inspection and an IPS profile on your LAN to LAN policies.
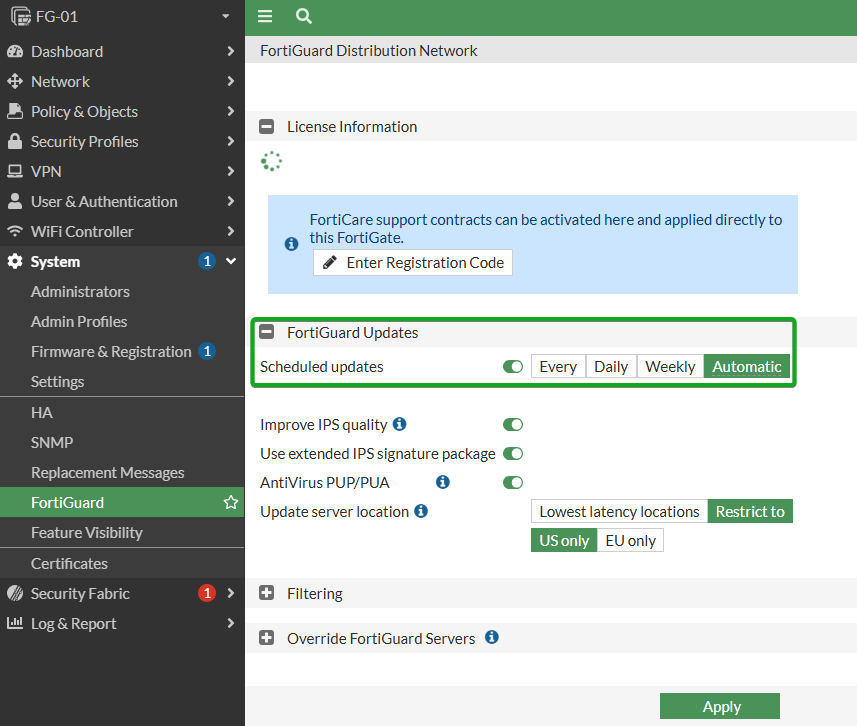
Antivirus: Ensure AV Definition push updates are configured
This ensures that the AV signature database is up to date. At a default this is enabled.
From the CLI
To verify run:
config system autoupdate schedule
show full
If the output shows the following, it is in the default desired state
config system autoupdate schedule
    set status enable
    set frequency automatic
end
From the GUI
Navigate to System -> FortiGuard and make sure that Scheduled updates is enabled and set to Automatic
Antivirus: Apply on all policies
AV on a FortiGate requires a minimum ATP Licensing Bundle.
AV with just a standard Cert Inspection profile is low risk to implement, as it only scans files on unencrypted protocols. This only amounts to around 5% of traffic on any network today. Full SSL Inspection, as some refer to as “Deep Packet Inspection” (DPI) is where you get the full value of gateway anti-virus. This is another component that deserves its own post so we wont cover that today. The good news is you can apply the policy with just Cert Inspection at any time, and then once you have prepared your networks for DPI, you can flip to the appropriate profile.
Implementation is as easy as applying cert-inspection and an antivirus profile to all policies (yes, even lan to lan, if an attacker lands on your network this could make be the difference that stops them from exploiting it further).
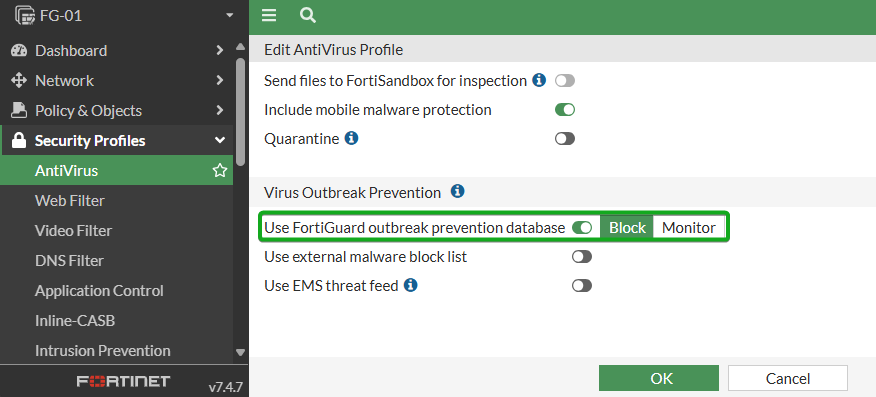
Antivirus: Enable Outbreak Prevention
This is a layer of protection on top of the FortiGuard signature-based detection. This allows the FortiGate to leverage 3rd party malware hash signatures. Without this service enabled, the FortiGate checks the signature against its own database that is frequently updated by FortiGuard. With it enabled, after checking the internal database, the FortiGate will send the hash to FortiGuard’s Global Threat Intelligence Database and if a match is found there it will block the file.
This is enabled on a per profile basis by enabling Use FortiGuard outbreak prevention database. This should be enabled for all AV Profiles.
Antivirus: Ensure that AI/ML malware detection is enabled
This setting can help to detect malicious Windows Portable Executables and mitigate zero-day attacks. This is a global setting and is enabled by default, so really just check to ensure it is still enabled, and re-enable if not.
To check if enabled run show antivirus settings | grep machine-learning-detection
show antivirus settings | grep machine-learning-detection
    set machine-learning-detection enable
Antivirus: Ensure that grayware detection is enabled
You may know Grayware by the terms “PUP/PUA” or Potentially Unwanted Program/Application. With this setting enabled, after passing the virus scan, the FortiGate will check the file against grayware signatures which are generally unwanted within professional business environment. This is a global setting and is enabled by default, so really just check to ensure it is still enabled, and re-enable if not.
To check if enabled run show antivirus settings | grep machine-learning-detection
show antivirus settings | grep grayware
    set grayware enable
Antivirus: Enable inline scanning with FortiGuard Sandbox service
This is dependent on an additional license and also requires the use of proxy profiles. While the FortiGate is performing the AV Scan, it also sends the file to a Sandbox where it can be opened and executed, then analyzed with AI to verify that it isn’t malicious. Even if the AV scan reveals that the file is clean, the FortiGate will wait to receive a verdict back from the Sandbox before releasing. For full info please see the official guide from Fortinet here.
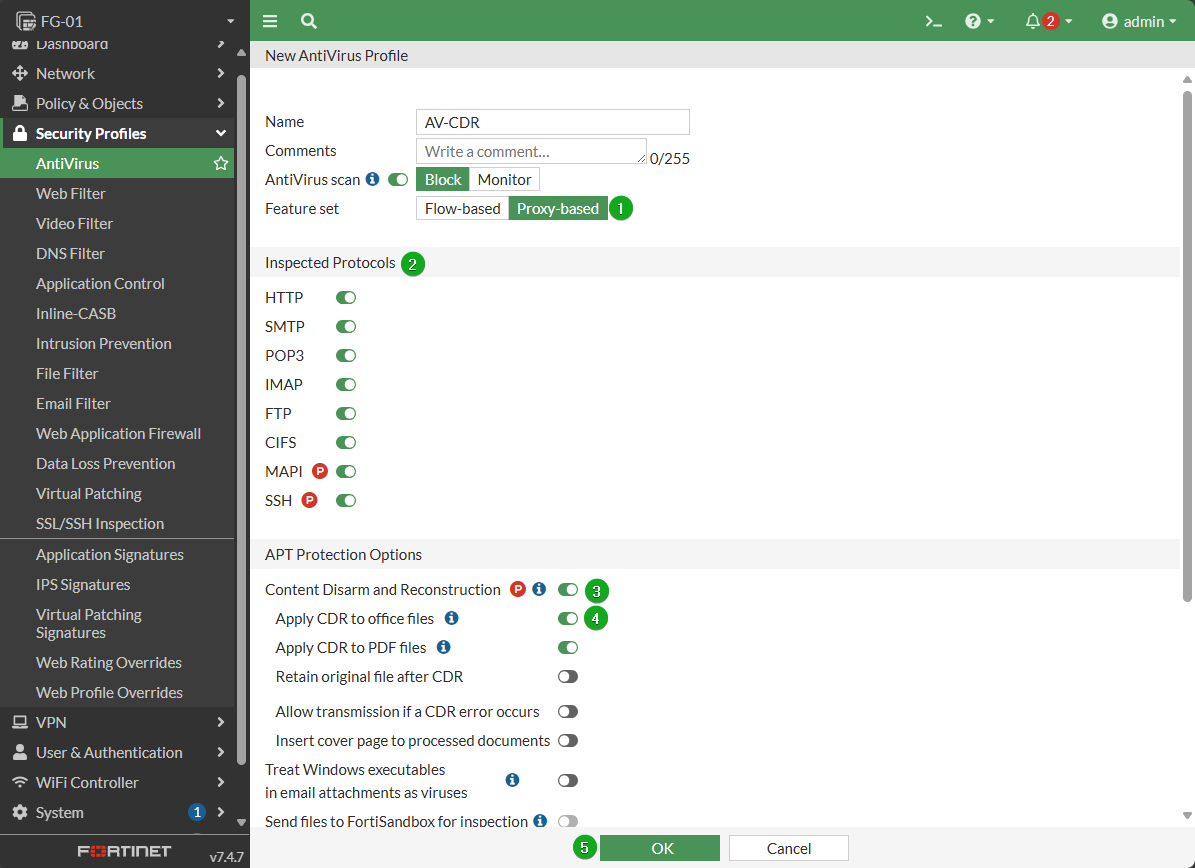
AntiVirus: enable Content disarm & reconstruction
This guidance is specifically for Microsoft Office, OpenOffice, and PDF files. Typically Modern Anti-Virus/EDR would protect against this, so this is just another layer of protection as a stop gap if that system failed, or for devices on the network that may not have or support antivirus. Additionally, these types of files are usually delivered via email, so an appropriate email security system should also stop them before they get to a machine. CDR scans the files for malicious content, Disarms it, and then Reconstructs the file without it.
Use of this feature would require migrating to to proxy mode policies instead of the default flow mode which is a higher resource overhead. My approach is to reserve this for networks containing devices with privleged access and very high security requirements.
To add this to an AV profile
Set the Feature Set to Proxy-based
Select Inspected Protocols
Enable Content Disarm and Reconstruction
Make sure it is enabled for office files
Select OK at the bottom to save
Once you have created this profile, enable it on your policies as required.
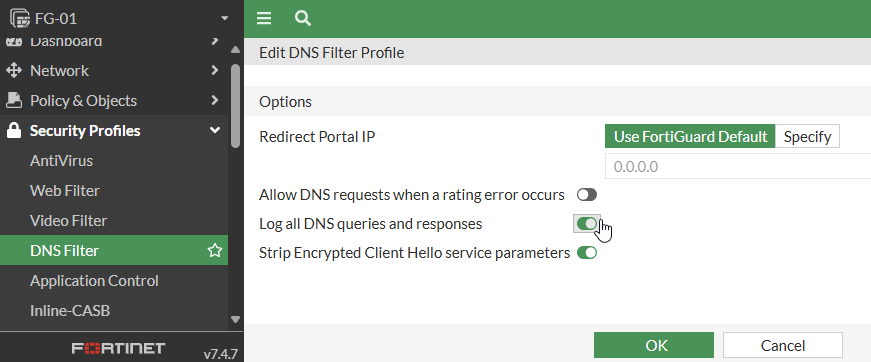
DNS Filter: Enable botnet C&C domain blocking
Deja Vu? This applies another layer of Botnet protection at the stage of DNS resolution. Check and ensure that all DNS profiles on the FortiGate have the Redirect botnet C&C requests to Block Portal option enabled, and ensure that all outbound internet traffic has a DNS Filter policy on it (even if you just set the action for all categories to Allow or Monitor). This is disabled by default.

DNS Filter: Log all DNS queries and responses
By logging all DNS queries and responses, SOC and NOC analysts can do deeper investigation on security or outage incidents. This is disabled by default.
WEB Filter: Block Risky categories
If not already using web filtering to enforce organization approved traffic, it should at a minimum be used to block all traffic to the FortiGuard maintained Malicious Websites, Phishing, and Spam URLs categories. This profile should be applied to all outbound internet traffic.

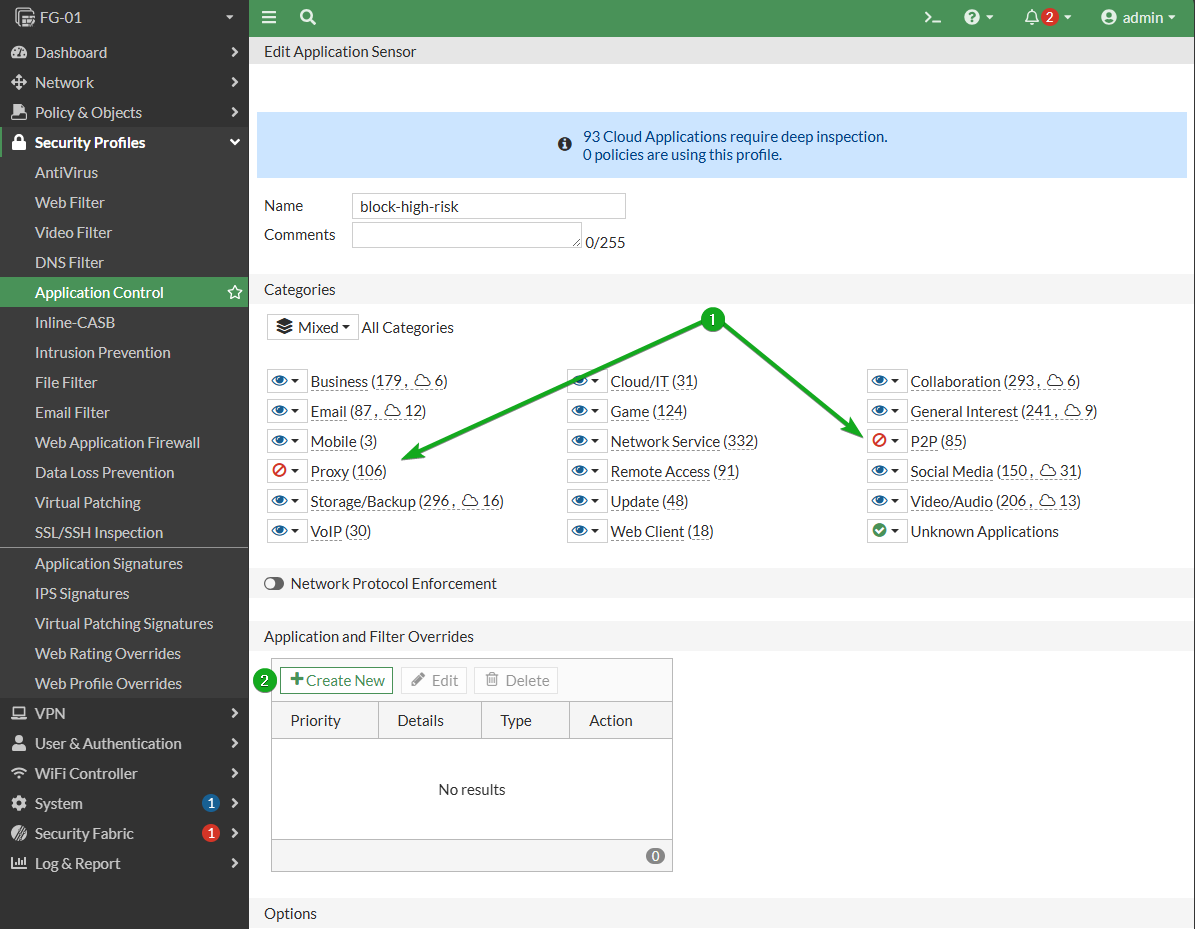
APP Control: block high risk apps
FortiGates come with an App Control profile named block-high-risk. This profile monitors all App categories, while blocking both Proxy and P2P categories. Blocking Proxy will ensure that your firewall security is not subverted by someone utilizing a proxy to get around it. Blocking P2P will ensure that your organization doesn’t have its internet terms of use violated with the ISP by having a rogue user torrent copywritten date. P2P is also very bandwidth heavy and if left unchecked can cause performance issues for your users. There are legitimate use cases for both Application types in a Business network, but due to the risk of these app types, the recommended strategy is block them all, and allow only the Applications that are required. This is done by using an override on the policy. All that is needed to implement is to apply the block-high-risk policy to all outbound internet policies, but a good first step would be to run the monitor-only profile and see if any legitimate business required traffic is caught so that you may appropriately allow it.
Categories set to blocked
Application Override
APP Control: block apps on non-default ports
While not a direct threat, apps on non-default ports can be due to something amiss. For instance an attacker may plant a rogue HTTPS server on a network which is setup to serve malware on port 10443. Before implementing, I would audit internal processes and identify anything requiring use of non-default ports for various services (such as how it is recommended to change the ports on the FortiGate, although this would be unaffected as App Control does not apply to Local-In traffic) and make appropriate exclusions before enabling. Once prepared, enable the Block applications detected on non-default ports slider on your App Control profile.
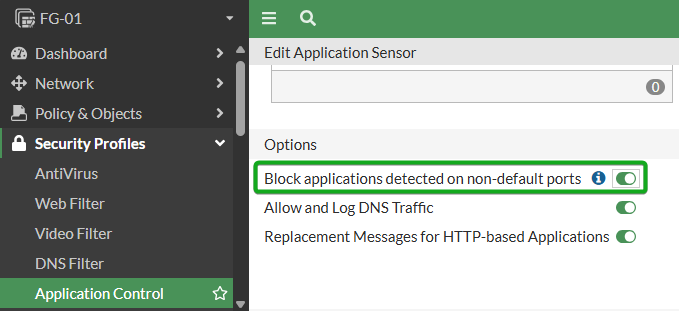
APP Control: Apply to all Policies and ensure all apps are logging
Even when a Firewall policy is set to log all, the application will not log if the action on the profile is set to Allow. Make sure that at a minimum, all Categories are set to monitor (see APP Control: Block High Risk Apps) so that you can see detailed application information in your forward traffic logs for the best logging foundation for NOC and SOC analysis, then apply this profile to all firewall policies.
Remote Access
Client SSL VPN
While CIS has a guide for appropriate controls on an SSL VPN, mine (and Fortinet’s) recommendation now is Don’t use SSL VPN. The time you would spend getting that to best practices would be better spent migrating to Dial-Up IPsec Client VPN or ZTNA.
Dial-Up IPsec Client VPN
I will update this at a future time with a guide, but for now, my recommendation is to set this up with SAML SSO and Microsoft Entra or Google Workspace is available. This way MFA is inherent. You could also leverage FortiAuthenticator if you have it. Here is Fortinet’s guide on setting it up.
Logs and Reports
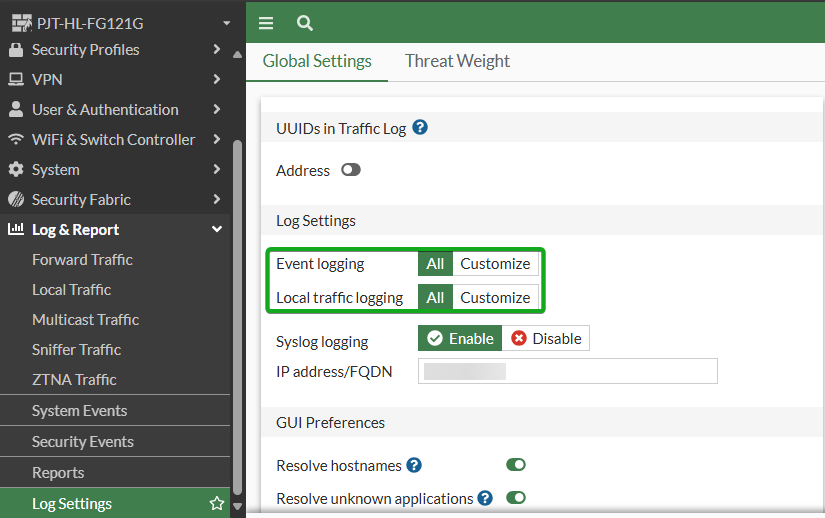
Enable Event Logging
This ensures that system event logs are stored for later review or integration into other systems like FortiAnalyzer. At a default this is enabled.
From the CLI
Run
config log eventfilter
show full
Output should show all types as enabled
config log eventfilter
    set event enable
    set system enable
    set vpn enable
    set user enable
    set router enable
    set wireless-activity enable
    set wan-opt enable
    set endpoint enable
    set ha enable
    set security-rating enable
    set fortiextender enable
    set connector enable
    set sdwan enable
    set cifs enable
    set switch-controller enable
    set webproxy enable
end
If disabled, run set event enable to enable all.
From the GUI
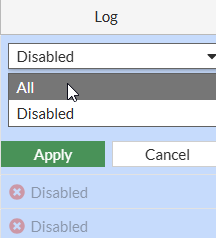
Navigate to Log & Report -> Log Settings and ensure that Event Logging and Local traffic logging are set to All.
Encrypt logs sent to Fortianalyzer
This will prevent logs from being intercepted and viewed in transit. This is done via CLI. At a default High Encryption is set, but without the setting set reliable enable the logs are not encrypted. From the CLI run each line starting with “get” below to see the current setting
get log fortianalyzer setting | grep reliable
reliable            : disable

get log fortianalyzer setting | grep enc-algo
enc-algorithm       : high
To enable, run
config log fortianalyzer setting
    set reliable enable
    set enc-algorithm high
end
Centralized logging and reporting
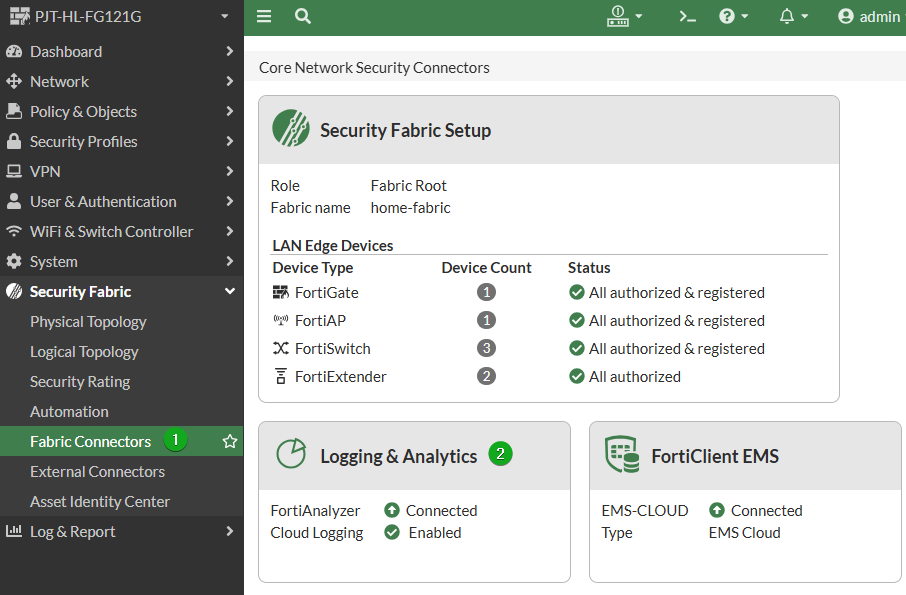
This warrants its own post, for now check these areas to see if central logging is configured, and if not at the very least setup and take advantage of FortiGate Cloud’s 7 Days of free cloud logging. To set this up navigate to (1) Security Fabric -> Fabric Connectors then (2) Double-click Logging & Analytics.
Switch to Cloud Logging
Select FortiGate Cloud
You will be prompted to input your FortiCloud credentials, once put in you will be connected.
Select OK to save

If you have a local SIEM or other Syslog device, configure it by navigating to Log & Report -> Log Settings then selecting enable and entering the IP or hostname and saving.
